Troubleshooting – Windows XP, Vista, 7 Computers
Computers can be very intimidating – especially when they start to throw a tantrum! Follow these easy-to-understand, basic Windows computer troubleshooting steps and fix your computer all by yourself.
The Windows XP Operating System
comes to you with a set of built-in tools which are designed especially
for troubleshooting. Now, let’s list out the things we need to do when
you notice something is ‘just not right ‘ in your computer.
Quick basic computer troubleshooting steps for you:
- Check for “Not Responding” applications in the Task Manager, using Ctrl+Alt+Del keys and stop it.
- Try LKGC (Last Known Good Configuration)
- If the error is due to a recently installed application or device driver, uninstall it.
- Try a system restore to a previous date
- Repair Windows
- If nothing works, say your prayers and re-install Windows (Have you backed up your data ?)
Detailed Basic Windows (XP, Vista, 7) Computer Troubleshooting:
Try out these steps one by one till your issue is resolved:
- If you notice that your computer has “frozen up” or just “stopped responding” – first give it some time to recover itself – and that could be say something like 3 – 5 minutes. (Tap on the NumLock key on your keyboard – if your computer is just busy, the Numlock light will go on & off when you tap the key. Else, if your computer is completely frozen, the NumLock light will just stay on.)
- If after, say 5 minutes your computer still does not respond, check the Task Manager and see which program shows up as “Not Responding” in it’s status. To get to the Task Manager, just hit <Ctrl>+<Shift>+<Esc> on your keyboard or right-click anywhere in the Task bar and select “Task Manager”.
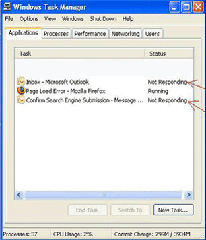
The Task Manager will look like this:
Now look at the image above, and note there are two programs that have a status of “Not Responding” – this is probably what has caused your computer to stop responding. Click on each of them and then click on the End Task button seen at the bottom of that dialog box. Then, in the next window, click OK to confirm your decision to terminate the application.Remember, doing this will result in loss of any unsaved data.
But once you have terminated the erring application, you can restart it again and carry on with your work.
- In case you were not able to terminate the frozen application, go ahead and restart your computer by clicking on the Start Button (if that responds, but chances are that, at this stage, it will not) or by using the power button in your computer. (You will lose any unsaved information, sorry!)
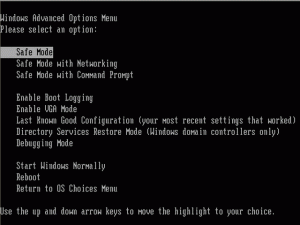
- Many times, your issues will get resolved after a simple restart of your computer. But what if the problem still persists? You still have a wide range of options. First – get to a screen called “Windows Advanced Boot Menu Options” – the easiest way to get there is to restart your computer, count 02 seconds and start tapping on the <F8> key on your keyboard. The Windows Advanced Options Menu screen would look something like the one given below:
As you see in the image above, there are a number of options. What we are primarily interested in is the option called “Last Known Good Configuration“. Use the arrow keys on your keyboard and navigate to that option and hit the <Enter> key on your keyboard.
Having done that, let’s
wait for your computer to restart itself to the most recent
configuration that worked. Generally, that should resolve a number of
problems.
But what if it hasn’t? There is one more option and it’s called “System Restore“
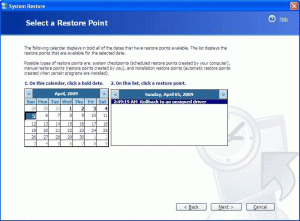
- In order to get to the System Restore option – Click on the Start Button -> All Programs -> Accessories -> System Tools ->System Restore. You will then see the “Welcome to System Restore” screen with the default option already selected “Restore my computer to an earlier time“. Click on the Next button to continue – you will get a screen that looks like the image given below:
Note the image above – you see a calendar with some dates which are highlighted. These are called restore points which were automatically created by Windows. You can select any of these restore points and click on the Next button to continue with the system restore wizard. Once you come out of the wizard, your computer should restart
and come back to the good working condition it was on the date that you
have selected. If one restore point did not work, you can always select
a different one. (It is also a good idea to create a restore point
when your computer was working fine, though Windows XP creates them
automatically).
Sometimes, you may not be
able to run System Restore because the computer cannot start up in the
normal way. But you can still start up your computer up in Safe Mode / Safe Mode with Command Prompt and run System Restore from the Command Prompt by typing:
%systemroot%\system32\restore\rstrui.exe
(%systemroot% is the same as C:\Windows.)
While you are doing this, you may be prompted to select the Operating System in your computer (select Windows XP Professional here) and also to enter your username and password. You should have Administrator rights in your computer to do this.
- If you get to the point when you have tried multiple system restores and it still does not fix your problem, you can still go and repair the windows installation in your computer. In order to do that please follow the steps given below:
How to Repair the Windows Installation in your computer?
- Boot from the Windows XP installation CD
- Choose press enter to set up Windows XP now
- Press F8 to skip through the End User License Agreement (EULA)
- Now press R to begin a repair installation
Please note: There are two things you can do here: First: When you first get the option which says “Press R to Repair a Windows XP installation…” it will take you to the Recovery Console where you have many options to Repair Windows in your Computer. Do NOT select this option, unless you want to land up at the Recovery Console and try to repair Windows from there.
Instead, wait till you get the same option a second time – you will get this option after you Accept the License Agreement (By pressing the F8 key) – then, wait for Windows to locate the Current Windows Installations in your Computer – Once Windows has identified the existing installations, you will be able to select that installation and Repair it by pressing R! Though, it will go through the full Windows XP re-installation process, it will not result in loss of data – as this procedure will only repair the Windows Operating Systems System Files in your computer.


No comments:
Post a Comment
If you have any doubt please let me know..