Wednesday, 17 August 2016

Computer haredware-iv


Motherboard
Alternatively referred to as the mb, mainboard, base board, main circuit board, system board, or a logic board.The motherboard is a printed circuit board that is the foundation of a computer. It allocates power to the CPU, RAM, and all other computer hardware components. Most importantly, the motherboard allows hardware components to communicate with one another.The first motherboard is considered to be one used in the IBM Personal Computer, released in 1981. Below is a picture of the ASUS P5AD2-E motherboard with names of each major component of the motherboard.


motherboard.jpg
Expansion Slot
Alternatively referred to as a bus slot or expansion port, an expansion slot is connection or port located inside a computer on the motherboard or riser board that allows a computer hardware expansion card to be connected. For example, if you wanted to install a new video card in the computer, you'd purchase a video expansion card and install that card into the compatible expansion slot.
Computer expansion slots
    AGP - Video card
    AMR - Modem, Sound card
    CNR - Modem, Network card, Sound card
    EISA - SCSI, Network card, Video card
    ISA - Network card, Sound card, Video card
    PCI - Network card, SCSI, Sound card, Video card
    PCI Express - Video card
    VESA - Video card

AGP

Short for Accelerated Graphics Port, AGP is an advanced port designed for Video cards and 3D accelerators. Designed by Intel and introduced in August of 1997, AGP introduces a dedicated point-to-point channel that allows the graphics controller direct access to the system memory. Below is an illustration of what the AGP slot may look like on your motherboard.
AGP slot
The AGP channel is 32-bits wide and runs at 66 MHz, which is a total bandwidth of 266 MBps and much greater than the PCI bandwidth of up to 133 MBps. AGP also supports two optional faster modes, with a throughput of 533 MBps and 1.07 GBps. It also allows 3-D textures to be stored in main memory rather than video memory.
AGP is available in three different versions, the original AGP version mentioned above, AGP 2.0 that was introduced in May of 1998, and AGP 3.0 (AGP 8x) that was introduced in November of 2000. AGP 2.0 added 4x signaling and was capable of operating at 1.5V and AGP 3.0 was capable of double the transfer speeds.

Where is AGP on the motherboard

Note: Today, AGP has been replaced by PCI Express.
A computer with AGP support has one AGP slot next to all other expansion slots or an on-board AGP video. If you needed more than one video card in the computer, you can have one AGP video card and one PCI video card or use a motherboard that supports SLI.
Tip: Not all operating systems support AGP because of limited or no driver support. For example, Windows 95 did not incorporate AGP support. If you are running an older version of Windows, see the Windows versions page for information about Windows versions that support AGP.

What is AGP Pro?

AGP Pro is an AGP interface extension specification for advanced workstations. This specification delivers additional power to video cards, includes an extended connector, thermal envelope, mechanical specifications, I/O bracket, and motherboard layout
AMR
AMR or Audio/Modem Riser slotReleased September 8, 1998, AMR is short for Audio/Modem Riser and allows OEMs to make one card that has the functionality of either Modem or Audio or both Audio and Modem on one card. This specification allows for the motherboard to be manufactured at a lower cost and free up industry standard expansion slots in the system for other additional plug-in peripherals. The picture an example of what the AMR slot looks like on the Motherboard. This slot is often on the far edge of the motherboard

PCI

Short for Peripheral Component Interconnect, PCI was introduced by Intel in 1992. The PCI bus came in both 32-bit (133MBps) and 64-bit versions and was used to attach hardware to a computer. Although commonly used in computers from the late 1990s to the early 2000s, PCI has since been replaced with PCI Express.
Revisions came in 1993 to version 2.0, and in 1995 to PCI 2.1, as an expansion to the ISA bus. Unlike ISA and other earlier expansion cards, PCI follows the PnP specification and therefore did not require any jumpers or dip switches. The picture below shows an example of what PCI slots look like on a motherboard. As you can see, there are three PCI slots: PCI4, PCI5, and PCI6.
CNR slot

Examples of PCI devices

PCI device drivers

If you are looking for PCI drivers, you most likely need to download them for a specific PCI device. For example, if you need a PCI Ethernet adapter driver, you should install the drivers for the network card. See our drivers section for a listing of drivers for various devices.
CNR
Short for Communication and Network Riser, CNR is a specification that supports Audio, Modem, USB, and LAN interfaces of core logic chipsets. This technology and the CNR slot was first introduced by Intel February 7, 2000 and was mainly developed by leading hardware and software developers who helped release the AMR (Audio Modem Riser) slot. In the picture below is an example of a CNR slot, which is labeled as "CNR_SLOT" on this motherboard.
Today, this slot is no longer found on motherboards and has been replaced with PCI only motherboards and motherboards with PCIe.
EISA
Short for Extended Industry Standard Architecture, EISA or Extended ISA is a standard first announced in September of 1988 for IBM compatible computers that competed with the MCA bus. The EISA bus is found on Intel 80386, 80486 and early Pentium computers and was designed by nine competitors. These competitors were AST Research, Compaq, Epson, Hewlett Packard, NEC, Olivetti, Tandy, WYSE, and Zenith Data Systems.
The EISA bus provided 32-bit slots at an 8.33 MHz cycle rate for use with 386DX or higher processors. EISA can also accommodate a 16-bit ISA card in the first row.
Although the EISA bus is backwards compatible and not a proprietary bus, it never became widely used and is no longer found in computers today.
ISA
1. Short for Industry Standard Architecture, ISA was introduced by IBM and headed by Mark Dean. ISA was originally an 8-bit computer bus that was later expanded to a 16-bit bus in 1984. When this bus was originally released it was a proprietary bus, which allowed only IBM to create peripherals and the actual interface. However, in the early 1980's other manufacturers were creating the bus.
In 1993, Intel and Microsoft introduced a PnP ISA bus that allowed the computer to automatically detect and setup computer ISA peripherals, such as a modem or sound card. Using the PnP technology, an end-user would have the capability of connecting a device and not having to configure the device using jumpers or dip switches.
All recent computers today no longer included the ISA slots and instead are using more PCI, AGP, and other slots. Below is a graphic of what an ISA expansion card may look like as well as the slot it connects into on the motherboard.
ISA SCSI computer card
Computer ISA expansion slot
PCI Express
Originally known as 3rd Generation I/O (3GIO), PCI Express, or PCIe, was approved as a standard on July 2002 and is a computer bus found in computers. PCI Express is a serial bus designed to replace PCI and AGP and is available in different formats: x1, x2, x4, x8, x12, x16, and x32. The data transmitted over PCI-Express is sent over wires called lanes in full duplex mode (both directions at the same time). Each lane is capable of around 250MBps and the specification can be scaled from 1 to 32 lanes. With 16 lanes PCI Express supports a bandwidth of up to 4,000MBps in both directions. Below are some graphic illustrations of what the PCI Express would look like on the motherboard.
PCI Express x1 slot
PCI Express x16 slot
VESA
Short for Video Electronics Standard Association, VESA is a group of monitor and video card manufacturers that set video display and bus standards. VESA was originally founded by NEC and is most well known for the VL Bus or VESA local Bus standard.
Many of the above expansion card slots are obsolete. You're most likely only going to encounter AGP, PCI, and PCI Express when working with computers today. In the picture below is an example of what expansion slots may look like on a motherboard. In this picture, there are three different types of expansion slots: PCI Express, PCI, and AGP.

Motherboard Port Guide: Solving Your Connector Mystery

  •  
  •  
  •  
  •  
  •  
  •  
  •  
By Loyd Case, PCWorld

Gigabyte 990FXA-UD7

Next we'll turn our attention to a motherboard that supports AMD CPUs. Note that AMD-chipset boards support many of the same features as Intel-based boards--that's the great thing about industry standards.
An AMD-compatible motherboard: the Gigabyte 990FXA-UD7.
 
24-pin ATX power: This connector exists on all current ATX-based motherboards, and is the standard means of connecting power from power supplies. This connector delivers power to all interfaces, including 3V, 5V, and 12V. The typical ATX12V version 2.3 PSU delivers up to 75W for PCI Express graphics cards; but numerous modern graphics cards need more than that, which is why you'll often find secondary six- or eight-pin power connectors on the graphics cards themselves.
ATX4P: This unusual item is actually a SATA power connector for delivering power to SSDs, hard drives, or optical drives from the motherboard itself.
TPM connector: Some off-the-shelf PCs and laptops use the Trusted Platform Module connector to link to a cryptographic processor module for storing encryption keys and handling dedicated encryption chores such as hard-drive encryption and certain types of digital rights management (DRM) decryption.
USB 3.0 front panel: This connector is used to drive front-panel USB 3.0 connectors. It requires more pins than USB 2.0 connectors do, but it drives two USB 3.0 ports instead of one. If your PC case lacks a USB 3.0 internal cable, you won't be able to use it. Like back-panel connectors, front-panel USB 3.0 ports are often color-coded blue.
AMD CPU socket: I'm calling out this component because its style differs from that of a modern Intel CPU socket. AMD CPUs still have pins, whereas Intel has moved the pins to the motherboard socket.

Intel DZ77GA-70K

I'm using a photo of just one section of this board, to call out some specific connectors and to get a little closer in. The Intel DZ77GA-70K motherboard is designed to accommodate the latest Intel Z77 chipset.
Part of the Intel DZ77GA-70K--a motherboard that hosts the latest Intel Z77 chipset.
 
Case fan header: As noted earlier, most higher-end motherboards have several of these fan headers scattered around the board. If enough of them are available, you should connect your fans to them, so that the BIOS can monitor and manage the fan speeds--unless you're a serious overclocker who uses separate fan-control modules.
PCI Express x4 slot: This relatively rare physical and electrical PCIe x4 slot is used for higher-performance networking cards and for some storage controller cards.
S/PDIF digital audio: This older type of connector was originally used to connect to CD-ROM drives. Today it's still used to connect to some optical drives and other audio devices that support S/PDIF (Sony/Philips Digital Interface) digital audio.
USB 3.0 front panel: The DZ77GA motherboard ships with two front-panel USB 3.0 connectors, driving up to four USB 3.0 ports on the front of the PC case.
High-current USB 2.0 front panel: This is a slightly different type of USB 2.0 connector. Though it acts as a normal USB 2.0 port when sending or receiving data, it can deliver extra current to permit fast charging of mobile devices, and it can even charge devices (like Apple's iPad) that requires more current than standard USB 2.0 normally delivers.
Consumer IR: This connector is used to attach front-panel infrared receivers, which enable users to control the PC via a standard programmable remote.
Diagnostic LEDs: Most motherboards have simple LEDs that light up or change color if the board experiences problems. A few higher-end boards, however, have these status LEDs, which flash an alphanumeric code that helps the user narrow down the source of a boot problem.
That wraps up our tour of various motherboard connectors, pins, and ports. Though I haven't covered all of the possibilities by any means, the ones listed here account for the vast majority of connectors you'll encounter on today's motherboards.
Rarely will you use every single connector on a board, but understanding these connectors should help you choose a PC case that suits your needs, or that accommodates new devices that you plan to add in an upgrade. Also, if you have a specific need, you'll be better able to shop for a motherboard capable of handling your application.


How to connect Panel LED and I/O Port to your motherboard

PANEL LED

Please follow MB manual to connect panel LED.

Cable-faq

RESET SW  (2-pin RESET) Connect RESET SW to MB , blue colors are “ + “
H.D.D LED  (2-pin IDE_LED) Connect HDD.LED to MB , orange colors are “ + “
POWER SW  (2-pin PWR SW) connect POWER SW , grey colors cables are “+”
POWER LED  (3-pin PLED) connect POWER LED , green colors cables are “+”
SPEAKER  (4-pin) connect SPEAKER , red colors cables are “+”

Jumper example:

Step 1

Step 2

Step 3

Step 4

I/O Port installation


HD AUDIO/ AC97


USB 2.0

IEEE 1394

E-SATA


Sunday, 26 July 2015

How to Lock File/Folder in Linux (Kali Linux)


Security is the most challenging task at this time. Every one want to safety whether it be his luggage, his jewelry or may be his important document. But now a days peoples save her document in his PC or Laptop. So PC security is too important for users. And we all know Windows users what they do??
ya right Antivirus. But we are Linux user. So don't take tension for Viruses. But however peoples hide or secure some contents from other users. So today we Learn how to Lock A Folder in Linux.

TrueCrypt  is a free open source on-the-fly encryption (OTFE) program. It's give many services like Encrypt Folder, Encrypt Entire Hard Disk, Lock a folder, Create virtual drive etc.

How to Install TrueCrypt:


Run following commands
sudo apt-get update
sudo apt-get install truecrypt
After these commands TrueCrypt installed successfully in your system.
Note:- In Kali Linux TrueCrypt already installed.
 
To Run;-


How to Lock A Folder by TrueCrypt:

1. First open your terminal via (ctrl+alt+t) and type "truecrypt" like this:
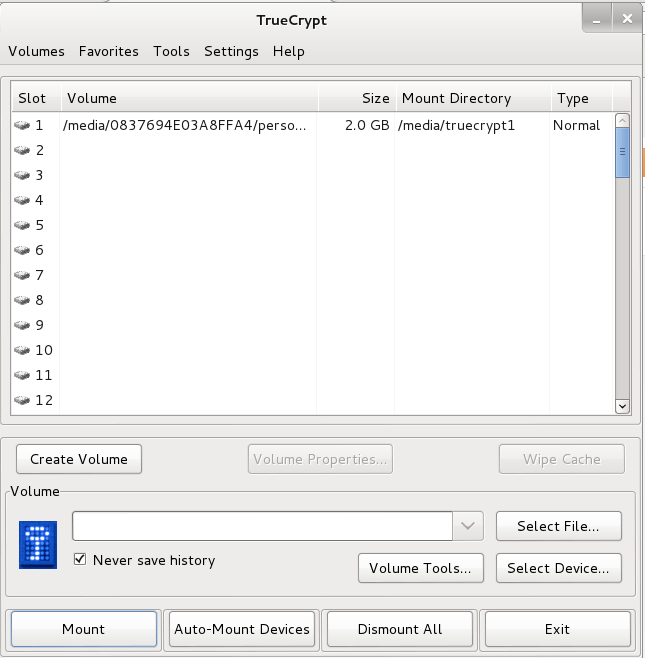
2. After this a TrueCrypt window appear like this:
Our goal is we want to lock our specific folders and files. so we create a new volume which have a password access. so click on volume menu and Create new volume.
3. After this a new window appear which have a radio button option. select the "Create an Encrypted File Container"  and click next Button like this:

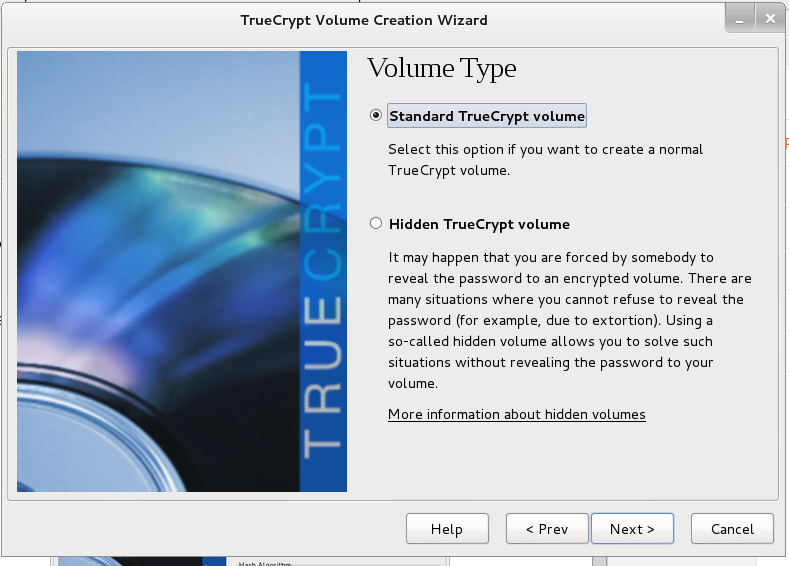
4. After this a new window appear which ask 'Volume type' Select the "Standard TrueCrypt Volume" and click Next like this:

5. After this A Volume Location window  appear. click on Select Button and give a volume path  which point a specific file location. and remember this file path in future.and Click on Next Button. window look like this:
6. After this a window appear which ask Encryption option Leave the default value and click on next. image look like:
7. After this a new windows appear which ask the Volume Size and the window also show your free space on your hard drive. Select the volume size as your requirement and Click on Next Button.
image look like this:


8. After this  TrueCrypt  Ask Volume password. type your password and retype next text box. you can also use key files for volume security. after give password Click on Next Button . Please always remember your password for future access. image look like this:
9. After giving password a format option window appear. here you select the file system type and Click on Next Button . image look like this:
10. After this a confirmation window appear for format. Click on Format Button. image look like this:
11. After some time a confirmation message appear on screen which says "The TrueCrypt volume has been successfully created". image look like this:
12. After the above steps your secured volume is created with password. you can store your private files and folders in this volume which highly encrypted by TrueCrypt.

How to Access & save file with password:


13 First open your terminal via (ctrl+alt+t) and type "truecrypt"  
14. After the step 13 , a TrueCrypt window appear. In this window an option available on bottom side. A "Select File" Button. Click on button Select the path which saved by you at step 5. And after the select path Click on "Mount" Button. Image look like this:
15.  When you click on Mount Button A sub Window appear on screen which ask for password.
Type password which gives by you at Step 8. Image look like this:
16. After the give password A TrueCrypt  Volume appear on desktop. and in your my computer menu. here you save & access your file. when your work is finish then unmount this volume. Next time when you access your file then follow the step 13-15. 

Saturday, 25 July 2015

Microsoft's Windows XP Home Install step by step.
This will give you an idea on how to do this when and if the time arises for US to either reinstall the operating system, install for the first time or upgrade OUR present operating system. This install guide is fully graphical and will take us through each step of the installation.
What we will require to do this walkthrough is
A Windows XP Home CD
A Computer with CD-ROM access

To start this Windows install. First check that the first boot device in your system BIOS is set to the  CD-ROM Drive.

( To find out how to access the BIOS please refer to your motherboard manual or the manufacturer of your Computer. (The system bios can usually be entered on boot, usually by pressing the F1, F2, F8, F10 or DEL key. Make sure you save the settings before exiting))

If you are unsure or don't want to enter the BIOS then just test the computer by putting the CD-ROM in the drive and reboot your computer. This is the recommended way to install windows.
PART 1
To begin insert your Windows XP Home CD and reboot you computer. Setup will boot automatically and then inspect your computer hardware and configuration.

Setup now prepares your computer for install.

From this menu press "ENTER" to begin the install.

Windows XP License agreement, read, and if you agree press "F8" to continue, press "ESC" if you disagree. If you disagree setup will finish.

PART 2

Now you have to select where to install XP. Press "ENTER" to confirm the partition you want to install into.

Now you need to format the hard drive, NTFS is recommended, but you can also use FAT32. Make your decision using the arrow keys and press enter.

The hard drive will now format.

PART 3

and then setup will begin to copy files.


Setup now initialises the Windows XP configuration.

It is now time to restart Windows XP, press "ENTER" to speed up process, otherwise Windows will do it itself in 15 seconds.

Boot will recognize that the XP CD is in the drive, DO NOT press any keys, let setup bypass the CD boot.

Windows is now booting.

PART 4

The install process continues.

Now your regional and language options. Your mouse should now be active, so click on "CUSTOMIZE".

Now select your Standards and Formats, plus your location, then click "OK".

Now click on "DETAILS".

Next select your default language, click "OK" when done.

Now that you have made all necessary changes click on "NEXT".

PART 5

Now it is time to personalize Windows. File in your name and if you wish you can also file in the Organization section. Click "NEXT" when ready.

Now it is time for your product key. The product key will be on the packaging that XP was supplied with. It is 25 digits long. Some OEM computers will have a sticker on the side or back with your product key. Input the key and press "NEXT".

Now select your computer name and your admin password. Confirm the Admin password and press "NEXT".

Date and Time settings are next, change as need be, then press "NEXT".

Windows will then continue installing.

PART 6

If a network card has been detected then you will get the following menu. Select "TYPICAL SETTINGS" and press next. This configured later in Windows.

More network configuration, change workgroup name if need be and click  "NEXT".

Windows will continue installing.

Windows install will now finalize.

It is now time to restart Windows XP again, press "ENTER" to speed up process, otherwise Windows will do it itself in 15 seconds.

Boot will recognize that the XP CD is in the drive, DO NOT press any keys, let setup bypass the CD boot.

Windows will continue loading.

PART 7

Windows will now adjust your resolution, click "OK" to continue.

If you are happy with the changes, click "OK" otherwise press "Cancel" to return to the old settings

"Welcome to Microsoft Windows" screen now appears, press "Next" to continue.

Internet connection option is next. If your computer connects to a home network or directly using the network card, or is on a network then select "Yes", otherwise select "No".


PART 8
Activate Windows option appears next, we recommend that you select "No, remind me every few days", that will allow you to make sure everything is correct and running OK before you use up one of your activate attempts. It also allows you to setup your security options and internet connection correctly. Click "Next to continue"

Windows now thanks you, click "Finish" to continue.

Finally setup the users for the computer, you must fill in option beside "Your name" the other four users are optional. Click "Next" once you have finished to continue.

Windows will now apply your settings...

Now Windows "WELCOME" screen.

and finally the Windows XP Desktop. Windows is now installed.


If you have commonly used P-III you will have no drivers to install, but chances are the next step will be to install them. Check out device manager for unknown devices, likely items are Network Cards, Sound Cards, Printers, Scanners, Graphics Cards, Digital Cameras, plus  any other item you have. Also consider installing anti-virus software, spyware software and possibly a 3rd party Firewall.

Tuesday, 21 July 2015

The Ultimate Installation Guide for Kali Linux

Introducing kali Linux

The creators of BackTrack have released a new, advanced penetration testing Linux distribution named kali Linux. BackTrack 5 was the last major version of the BackTrack distribution. The creators of BackTrack decided that to move forward with the challenges of cyber security and modern testing a new foundation was needed. Kali Linux was born and released March 13th 2013. Kali Linux is based on Debian and an FHS-Compliant file system.
Kali has many advantages over the BackTrack. It comes with many more updated tools. The tools and streamlined with Debian repositories and synchronized four times a day. That means users have the latest package updates and security fixes. The new compliant file systems translate into running most tools from anywhere on the system. Kali has also made customization, unattended installation, and flexible desktop environments and strong feature in Kali Linux.
Kali Linux is available for download at (http://www.kali.org/).

Kali Linux Setup

Kali Linux can be downloaded in a few different ways. One of the most popular ways to get Kali Linux is to download the ISO image. The ISO image is available in 32-bit and 64-bit images.
If you plan on using Kali Linux on a virtual machine such as VMware, there is a VM image prebuilt. The advantage of downloading the VM image is that is comes preloaded with VMware tools. The VM image is a 32-bit PAE. In theory, a PAE kernel allows the system to access more system memory than a traditional 32-bit operating system. There have been some well-known personalities in the world of operating systems that have argued for and against the usefulness of PAE kernel. However, the authors of this book suggest using the VM image of Kali Linux if you plan on using it in a virtual environment.

Running Kali Linux from External Media

Kali Linux can be ran without installing software on a host hard drive by accessing it from a external media source such as USB drive or DVD. This method is simple to enable however has performance and operational implementations. Kali Linux having to load programs from a remote source would impact performance and some applications or hardware settings may not operate properly. Using a read only storage media does not permit saving custom settings that may be required to make Kali Linux operate correctly. It’s highly recommended to install Kali Linux on a host hard drive.

Installing Kali Linux

Installing Kali Linux on your computer is straightforward and similar to installing other operating systems. First, you’ll need compatible computer hardware. Kali is supported on i386, amd64, and ARM (both armel and armhf) platforms. The hardware requirements are listed below, although we suggest exceeding the minimum amount by at least 3 times. The better hardware Kali Linux runs on, the better the performance and user experience will be. Download Kali Linux and either burn the ISO to DVD, or prepare a USB stick with Kali Linux Live as the installation medium. If you do not have a DVD drive or USB port on your computer, check out the Kali Linux Network Install.
Installation Minimum requirements:
·       A minimum of 8 GB disk space for the Kali Linux install.
·       For i386 and amd64 architectures, a minimum of 512MB RAM.
·       CD-DVD Drive / USB boot support
·       You will also need an active Internet connection before installation. This is very important or you will not be able to configure and repositories during installation.
When you start Kali you will be presented with a Boot Install screen. You may choose what type of installation (GUI based or Text Based) you would like to perform.
Kali_install_1
Kali Linux Boot Screen
Select the local language preference, country, and keyboard preferences.
Kali_install_2
Language Preference
Select a hostname for the Kali Linux host. The default hostname is Kali.
Kali_install_3
Hostname
Select a password.
Simple passwords may not work so chose something that has some degree of complexity.
Kali_install_4
Selecting a Password
The next prompt asks for your time zone. Modify accordingly and select continue. The next example shows selecting Eastern Standard time.
Kali_install_5
The installer will ask to setup your partitions. If you are installing Kali on a virtual image, select Guided Install – Whole Disk. This will destroy all data on the disk and install Kali Linux. Keep in mind on a virtual machine, only the virtual disk is getting destroyed.
Kali_install_6
Setting time zones
Advanced users can select manual configurations to customize partitions.
Kali also offers the option of using LVM, logical volume manager. LVM allows you to manage and resize partitions after installation. In theory, it is supposed to allow flexibility when storage needs change from initial installation. However, unless your Kali Linux needs are extremely complex, you most likely will not need to use it.
Kali_install_61
Partitioning your system
The last window displays a review of the installation settings. If everything looks correct, select yes to continue the process as shown in the next screenshot.
Kali_install_7
Partition Details
 Kali Linux using central repositories to distribute application packages. If you would like to install these packages, you need to use a network mirror. The packages are downloaded via HTTP protocol. If your network uses a proxy server, you will also need to configure the proxy settings for you network.
Kali_install_8
Configuring a Network Mirror
Kali will be prompt to install GRUB. GRUB is a multi-bootlader that gives the user the ability to pick and bootup to multiple operating systems. In almost all cases, you should select to install GRUB. If you are configuring your system to duel boot, you will want to make sure GRUB recognizes the other operating systems in order for it to give users the options to boot into an alternative operating system. If it does not detect any other operating systems, the machine will automatically boot into Kali Linux.
Kali_install_9
Installing Grub
Congratulations! You have finished installing Kali Linux. You will want to remove all media (physical or virtual) and select continue to reboot your system.
Kali_install_10
Finish Installation

Kali Linux and VM Image First Run

On some Kali installation methods, you will be asked to set the root password. When Kali Linux boots up, enter the root username and the password you selected. If you downloaded a VM image of Kali, you will need the root password. The default user name is root and password is: toor.
Kali_install_11
Logging into Kali
The first thing you need to do on Kali Linux is prep the system for VM Tools. You do so by issuing the following commands:
Note: all commands are typed  in the terminal
 echo cups enabled >> /usr/sbin/update-rc.d
echo vmware-tools enabled >> /usr/sbin/update-rc.d
apt-get install gcc make linux-headers-$(uname -r)
Kali_install_12
Prepping Kali for VM Tools
Note: This is typed as one line
ln -s /usr/src/linux-headers-$(uname -r)/include/generated/uapi/linux/version.h /usr/src/linux-headers-$(uname -r)/include/linux
Kali_install_13
Prepping Kali for VMWare Tools Install
Now you are ready to mount the VM Tools CD. Simply go to the menu in VMWare and install VM Tools. NOTE: I did this from VMWare Fusion, but the process will be the same regardless of VMWare platform.
Kali_install_14
Loading VMWare Tools
Now go back to Kali Linux and use the following commands:
mkdir /mnt/vmware
mount /dev/cdrom /mnt/vmware/
cp -rf /mnt/vmware/VMwareTools* /tmp/
Kali_install_15
Copy VMWare Tools to temporary folder
Next, you will change to the /tmp directory and run the VM Tools installation script.
cd /tmp/
tar zxpf VMwareTools-*.tar.gz
cd vmware-tools-distrib/
Kali_install_16
Unpacking VMWare Tools and Listing in directory
Lastly type: “ ./vmware-tools-install.pl” to run the VM Tools installation script. Follow the onscreen instructions when you run the script.

Kali Linux Toolset Overview

Kali Linux offers a number of customized tools designed for penetration testing. Tools are categorized in the following groups as seen in dropdown menu shown below.
Kali_install_17
Kali Menu
Information Gathering – These are reconnaissance tools used to gather data on your target network and devices. Tools range from identifying devices to protocols used.
Vulnerability Analysis – Tools from this section focus on evaluating systems for Vulnerabilities. Typically, these are run against systems found using the Information Gathering reconnaissance tools.
Web Applications – These are tools used to audit and exploit vulnerabilities in web serversMany of the audit tools we will refer to in this book come directly from this category. Although web applications do not always refer to attacks against web servers, they can simply be web-based tools for networking services. For example web proxies will be found under this section.
Password Attacks – This section of tools primarily deals with brute force or the offline computation of password or shared keys used for authentication.
Wireless Attacks – These are tools used to exploit vulnerabilities found wireless protocols. 802.11 tools will be found here, including tools such as aircrack, airmon and wireless password cracking tools. In addition, this section has tools related to RFID and Bluetooth vulnerabilities as well. In many cases, the tools in this section will need to be used with a wireless adapter that can be configured by Kali to be put in promiscuous mode.
Exploitation Tools – These are tools used to exploit vulnerabilities found in systems. Usually vulnerability is identified during a Vulnerability Assessment of a target.
Sniffing and Spoofing – These are tools used for network packet captures, network packet manipulators, packet crafting applications and web spoofing. There are also a few VoIP reconstruction applications.
Maintaining Access – Maintaining Access tools are used once a foothold is established into a target system or network. It is common to find compromised systems having multiple hooks back to the attacker to provide alternative routes in the event a vulnerability that is used by the attacker is found and remediated.
Reverse Engineering – These tools are used to disable an executable and debug programs. The purpose of reverse engineering is analyzing how a program was developed so it can be copied, modified or lead to development of other programs. Reverse Engineering is also used for malware analysis to determine what an executable does or by researchers to attempt to find vulnerabilities in software applications.
Stress Testing – Stress Testing tools are used to evaluate how much data a system can handle. Undesired outcomes could be obtained from overloading systems such as causing a device controlling network communication to open all communication channels or a system shutting down (also known as a Denial of Service attack).
Hardware Hacking – This section contains Android tools, which could be classified as mobile, and Ardunio tools that are used for programming and controlling other small electronic devices.
Forensics – Forensics tools are used to monitor and analyze computer network traffic and applications.
Reporting Tools – Reporting tools are methods to deliver information found during a penetration exercise.
System Services – This is where you can enable and disable Kali services. Services are grouped into BeEF, Dradis, HTTP, Metasploit, MySQL and SSH.
note

Updating Kali Linux

After you have Kali Linux setup, you will want to update the packages. You do so my issuing the apt-get update command.
Kali_install_18
Next, issue the apt-get upgrade command. You may be asked to confirm disk space and other warning messages. Type Y to continue.
Kali_install_19
Finally the updatedb command from a terminal window. This command will ensure the applications are in the Kali database and can be found when a user executes the locate command.
Kali_install_20

Summary

Congratulations, you have successfully installed and updated Kali Linux. Kali is a powerful penetration platform. I recommend that you play around with Kali. You will find some key differences between Backtrack and Kali and some of these differences take time to learn. However, I am sure you will appreciate the power and flexibility of platform. Happy hacking!
These concepts and much more can be found in Aamir Lakhani and Joseph Muniz’s book Web Penetration Testing with Kali Linux.