Saturday, 12 October 2013
Saturday, 24 August 2013
How to install dvwa in kali linux
How to install dvwa in kali linux

Intro - Damn Vulnerable Web App (DVWA) is a
PHP/MySQL web application that is damn vulnerable. Its main goals are to be an
aid for security professionals to test their skills and tools in a legal
environment, help web developers better understand the processes of securing
web applications and aid teachers/students to teach/learn web application
security in a class room environment.It is a best platform to practice web
application hacking and security.
1. Download DVWA http://sourceforge.net/projects/dvwa/
(click image for large view)

2. Unzip download file

3. Copy dvwa folder into Computer → File system →
var →
www

4. Set permission of DVWA into 755 for this open Termianl
and type
chmod -R 755
/var/www/dvwa and hit enter

5. Run Apache for this go to Application →
kali linux →
System Service → HTTP → apache2start

6. Apache run successfully

7. Run My SQL for
this go to Application → kali linux → System Service →
MySQL →
mysql start

8. My SQL run successfully

9. Now Create Database for dvwa
→ Open Terminal and
type
→ mysql –u root –p and hit enter
→ when it ask for Password simply hit enter
→ now type create
database dvwa; and hit enter (here you can see an error because I have
already created my database for dvwa but if you are creating first time than
you will see a successful msg)
→ If you want to exit terminal type exit and hit enter

10. Now go to your browser and write http://127.0.0.1/dvwa
or http://localhost/dvwa and write your username and password by default it is
username – admin and password – password than click in login

11. Are you getting this error Table 'dvwa.users' doesn't exist ?

12. Now time to solve the above error open terminal and
type curl --data ‘create
db=create+%2F+Reset+Database’ http://127.0.0.1/dvwa/setup.php# --cookie
PHPSESSID=1 and hit enter

13. Now again go to your browser and login with default
username and password

14. You have successfully logged in.

(click image for large view)
Tuesday, 13 August 2013
How to Reset Windows 8 Password If Forgot or Lost?
Forgot Windows 8 password and need to reset it? See how I do it.
Is it extremely frustrating and annoyed when you lost or forgot Windows 8 password?
So you locked out of your computer. Maybe you will ask: Is it possible
to reset the forgotten Windows 8 password instantly? Fortunately, you
are right here. We will introduce 4 simple ways for you to reset password Windows 8 if you forgot or lost it.
Option 1: Apply Previously-created win 8 password reset disk
Have you ever created windows 8 password reset disk? If you have done that, i think you are very luckily! This is because it is very simple to reset password Windows 8 with Windows password rest disk. Of course, for those who forgot to create this password reset disk, they have to see the option 2 , 3 or 4. Now let’t begin to reset Windows 8 password with Previously-created win 8 password reset disk.
[1]: Login in win 8 with an incorrect password, click “ok”
[2]: Click “Reset Password” item, then you will see the password reset wizard.
[3]: Plug previously-created win 8 password reset disk in your PC, then click “Next”.
[4]: Choose the inserted win 8 password reset disk and click “Next”.
[5]: Type a new Win 8 password and password hint, and then click “Next”.
[6]: When Windows 8 password reset finishes, click “Finish” button.
Option 2: Try Another Windows 8 Administrator Account
First what you should clear is that: Are you able to log in your PC with built-in administrator account or other available admin account? Of course, the Windows 8 password reset can be very easy if your answer is yes. Otherwise, have a try the option 3, or 4. However, if you are the luckily one, I have to remind you that all personal certificates, EFS-encrypted files and stored password for websites and network resources will be lost if you use this method. In other words, if you mind losing those data, this method is obviously not suitable for you. Here begins Windows 8 password reset with another admin account.
[1]: Login in Win 8 with another administrator account.
[2]: First find the the search box, then type “user accounts” in it. From the search results, select user accounts.
[3]: It will show you all win 8 user accounts when user accounts windows open.
[4]: Choose the user account which you need to reset the password.
[5]: First you need to type a new password 2 times, and a password hint one time. At last click “change password” button.
Option 3: Use Free Windows 8 Password Reset Tool — Ophcrack
With respect to reset forgotten Windows 8 password, you can still resort to free windows 8 password reset tool. Of course, there are kinds of Windows 8 password reset tool available on the internet, such as Ophcrack, Offline NT Password & Registry Editor, PC Login Now, Kon-Boot and so on.
Among them, Ophcrack is the most popular one, which based on rainbow tables. However, it only help you crack 99.9% of alphanumeric passwords of up to 14 characters in usually a few minutes. If you really need it to reset your lost Windows 8 password, download it from its official website directly.
Option 4: Take Advantage of Third-Party Windows 8 Password Recovery Software
Free Windows 8 password reset solutions doesn’t work at all? Try to create a win 8 password reset disk with third-party Windows 8 password recovery tool instead, like Windows Password Recovery Tool. with it, even a computer newbie can reset forgotten Windows 8 password within 3 minutes, regardless of password complexity and strength. 100% password reset rate is guaranteed.
This windows 8 password reset method only takes 3 parts: Download – Burn – Reset. Download and burn operation can only done on another unlocked computer which you can run as admin.
[1]: First you have to get another computer which you can download software. Then download and install Windows Password Recovery Tool on it.
[2]: Burn a password reset disc by inserting a blank and writable CD/DVD and clicking “Burn CD/DVD” button on the interface to start burning process. (you can also apply USB flash drive)
[3]: Insert the burned password reset disc to the target computer and set this win 8 PC boot from CD/DVD(USB) in BIOS.
[4]: Following the instructions to reset lost Windows 8 user password, only 3 clicks.
[5]: Log in win 8 without password
Each method has its advantages and disadvantages. You can choose one of them according to your situation. Hope these Windows 8 password reset methods can help you!
Use your windows 7 to setup a Software Wireless Access Point (SoftAP)
[Tutorial] Use your windows 7 to setup a Software Wireless Access Point (SoftAP) to share your PC Internet connection without any extra hardware or software (NOT Ad-Hoc)
I got my Nexus 7 a few days ago, and it doesn't have a 3g modem in
it. That means I cannot use a mobile internet with this device. Tried to
create an ad hoc network in my windows 7 pc, and it cannot even detect
the ad hoc network. This is already a known problem for android ICS (ice
Cream Sandwich) and Jelly Bean.
After some research, I found out that ICS and JB only can detect "Infrastructure" based WiFi signal. Ad hoc network is using another type of signal that ICS and JB cannot detect unless you root and tweak your phone's wpa_supplicant files. In which they are known to cause abnormal behavior of the OS itself.
So, I call myself an IT professional and ahacker.
How can I surrender to such a small problem! There must be a solution
somewhere. Again, after some research, I realized that Windows 7
actually provide 2 drivers for a network card. Basically 1 of it is what
you use everyday, as a client that receive service from an AP. The
other 1, is the driver to make your wireless network card an wireless
access point itself! (SoftAP)
OK! SO THEY HAVE THIS HANDY FEATURE BUT WHY I NEVER SEE IT?
ANSWER: Basically there is no native GUI to do all this, so you have to use command prompt to do all this.
Following will be the step by step guide to setup a SoftAP using your windows 7 without any additional application. If you want to use an application to do this, there are some out there in the market, 1 of it i think is good is called Connectify, I never tried it though so I won't comment on it.
Basically, to setup an SoftAP, then share ur PC internet to this SoftAP and then make sure devices that connect to this SoftAP takes 5 major steps:
1) Setup the SoftAP
2) Share the Internet to SoftAP
3) Startup the services required for Internet Sharing
4) Start your SoftAP
5) make sure your device connect properly to the SoftAP
and here we GO:
________________________________________________________
1) Setup the SoftAP
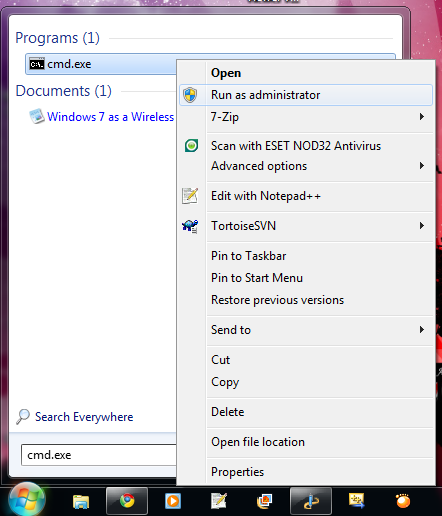
i) Run cmd.exe as administrator and enter the following command. Substitute "ssid" with the SoftAP name u desired and "passphrase" with the password to connect to the SoftAP u desired, both without the quotation marks. This will create the required “Microsoft Virtual WiFi Miniport adapter” and also set up your hostednetwork.
Voila, first step is done, your SoftAP interface is now available, next up we will need to do the Internet sharing.
_________________________________________________________________________________
2) Share the Internet to SoftAP
i) Open network and sharing centre
ii) Click Change Adapter Setting
iii) Select the adapter that are connected to the internet, "Right Click" -> "Properties"
iv) Click on "Sharing' tab
v) Check the checkbox that says "Allow other network users to connect through this computer's Internet connection". In the dropdownbox, select the SoftAP (In my case, Wireless Network Connection 5)
vi) Step 2 DONE!
_________________________________________________________________________________
3) Startup the services required for Internet Sharing
This step is the most technical step of all the steps
i) Run services.msc. (Type services.msc in start menu and you will have it)
ii) Find the following item in the list and start them IF THEY ARE NOT (Right click -> Start):
**If you want these services start after you restart computer, change their properties to Automatic**
--
Application Layer Gateway Service
Network Connections
Network Location Awareness (NLA)
Plug And Play
Remote Access Auto Connection Manager
Remote Access Connection Manager
Remote Procedure Call (RPC)
Telephony
Windows Firewall
After some research, I found out that ICS and JB only can detect "Infrastructure" based WiFi signal. Ad hoc network is using another type of signal that ICS and JB cannot detect unless you root and tweak your phone's wpa_supplicant files. In which they are known to cause abnormal behavior of the OS itself.
So, I call myself an IT professional and a
“On Windows 7 and later, the operating system installs a virtual device if a Hosted Network capable wireless adapter is present on the machine. This virtual device normally shows up in the “Network Connections Folder” as ‘Wireless Network Connection 2’ with a Device Name of ‘Microsoft Virtual WiFi Miniport adapter’ if the computer has a single wireless network adapter. This virtual device is used exclusively for performing software access point (SoftAP) connections and is not present in the list returned by the WlanEnumInterfaces function. The lifetime of this virtual device is tied to the physical wireless adapter. If the physical wireless adapter is disabled, this virtual device will be removed as well.”
OK! SO THEY HAVE THIS HANDY FEATURE BUT WHY I NEVER SEE IT?
ANSWER: Basically there is no native GUI to do all this, so you have to use command prompt to do all this.
Following will be the step by step guide to setup a SoftAP using your windows 7 without any additional application. If you want to use an application to do this, there are some out there in the market, 1 of it i think is good is called Connectify, I never tried it though so I won't comment on it.
Basically, to setup an SoftAP, then share ur PC internet to this SoftAP and then make sure devices that connect to this SoftAP takes 5 major steps:
1) Setup the SoftAP
2) Share the Internet to SoftAP
3) Startup the services required for Internet Sharing
4) Start your SoftAP
5) make sure your device connect properly to the SoftAP
and here we GO:
________________________________________________________
1) Setup the SoftAP
i) Run cmd.exe as administrator and enter the following command. Substitute "ssid" with the SoftAP name u desired and "passphrase" with the password to connect to the SoftAP u desired, both without the quotation marks. This will create the required “Microsoft Virtual WiFi Miniport adapter” and also set up your hostednetwork.
netsh wlan set hostednetwork mode=allow ssid="ssid" key="passphrase" keyUsage=persistent
 |
| Run cmd as Administrator |
 |
| The command and its appropriate output if success (Click to enlarge) |
 |
| Microsoft Virtual WiFi Miniport Adapter will shown if success (Click to enlarge) |
_________________________________________________________________________________
2) Share the Internet to SoftAP
i) Open network and sharing centre
ii) Click Change Adapter Setting
iii) Select the adapter that are connected to the internet, "Right Click" -> "Properties"
iv) Click on "Sharing' tab
v) Check the checkbox that says "Allow other network users to connect through this computer's Internet connection". In the dropdownbox, select the SoftAP (In my case, Wireless Network Connection 5)
 |
| Click to enlarge |
_________________________________________________________________________________
3) Startup the services required for Internet Sharing
This step is the most technical step of all the steps
i) Run services.msc. (Type services.msc in start menu and you will have it)
ii) Find the following item in the list and start them IF THEY ARE NOT (Right click -> Start):
**If you want these services start after you restart computer, change their properties to Automatic**
--
Application Layer Gateway Service
Network Connections
Network Location Awareness (NLA)
Plug And Play
Remote Access Auto Connection Manager
Remote Access Connection Manager
Remote Procedure Call (RPC)
Telephony
Windows Firewall
--
**If you want these services start after you restart computer, change their properties to Automatic**
iii) After all services are started, Step 3 is done
_________________________________________________________________________________
4) Start your SoftAP
This step is easy, the command to start/stop the hostednetwork is “netsh wlan start|stop hostednetwork” and it needs to be run as adminstrator. Since you will have to start/stop the hostednetwork every time you start/stop your computer, I would advice you to create desktop shortcuts for there commands and set them to run as administrator.
_________________________________________________________________________________
5) make sure your device connect properly to the SoftAP
Now, the setup of this AP is successful. In order to connect to this SoftAP, I find it best to use static IP, else it will have quite some connection problem. The setting is as following:
**Set this in the device you want to connect to the SoftAP**
--
IP: range from 192.168.137.2 to 192.168.137.254
Subnet mask: 255.255.255.0
Default gateway: 192.168.137.1
DNS: 8.8.8.8
alternate DNS: 8.8.4.4
--
**Set this in the device you want to connect to the SoftAP**
_________________________________________________________________________________
By using this method, ANY devices including android Ice Cream Sandwich (ICS) and Jelly Bean (JB) devices that can't detect ad-hoc signal can now share Internet of your PC!
**If you want these services start after you restart computer, change their properties to Automatic**
 |
| Click to enlarge |
_________________________________________________________________________________
4) Start your SoftAP
This step is easy, the command to start/stop the hostednetwork is “netsh wlan start|stop hostednetwork” and it needs to be run as adminstrator. Since you will have to start/stop the hostednetwork every time you start/stop your computer, I would advice you to create desktop shortcuts for there commands and set them to run as administrator.
 |
| Shortcut to start hostednetwork |
 |
| Shortcut to stop the hostednetwork |
 |
| MISSION ACCOMPLISHED!! After run "netsh wlan start hostednetwork" |
_________________________________________________________________________________
5) make sure your device connect properly to the SoftAP
Now, the setup of this AP is successful. In order to connect to this SoftAP, I find it best to use static IP, else it will have quite some connection problem. The setting is as following:
**Set this in the device you want to connect to the SoftAP**
--
IP: range from 192.168.137.2 to 192.168.137.254
Subnet mask: 255.255.255.0
Default gateway: 192.168.137.1
DNS: 8.8.8.8
alternate DNS: 8.8.4.4
--
**Set this in the device you want to connect to the SoftAP**
_________________________________________________________________________________
By using this method, ANY devices including android Ice Cream Sandwich (ICS) and Jelly Bean (JB) devices that can't detect ad-hoc signal can now share Internet of your PC!
BY THIS POINT, THIS TUTORIAL HAS ENDED. THIS METHOD WORKS TOTALLY FINE IN MY CASE. GOOD LUCK.
Tuesday, 6 August 2013
How to convert 2GB USB into 4GB?
How to convert 2GB USB into 4GB?
USB is a device that is use to transfer data from one computer to another.Today large volume USB are
available in the market but they are expensive.Most of the computer users must have a USB flash drive.The commonly used USB drive is 2GB but today high volume usb are popular.We know that the large volume size usb can save more files.Today i am going to share a awesome usb trick with you the trick is "how to convert 2GB usb into 4GB",these words gives you happiness but sometimes when you try to do this you not find the software but today i am provide you software without any add.If you want to convert your USB into 4GB than you need to formate your USB drive if you not do this than your data will be lost.You can try this trick on your Memory Card.We start our work without loss our time you need to just carefully read my
instructions with screen shoots.
How to make your 2GB USB to 4GB?
1. Download the software from the given link.2. Extract the software in a folder and open the folder.

3. Connect you USB flash drive with computer.Always use Card Reader for Memory Cards.
4. Now go to that folder where you extracted the software and open the "Drive Increaser.bat" file.

5. It will ask you pendrive or memory card name.Just give you USB or Memory card name carefully
without spelling mistakes.
6. It will ask you now enter the drive letter.Go to My Computer and see which drive contains the
pendrive or memory card.Most of the time the "H" drive contains your USB or memory card.Just type
the drive letter and hit enter.

7. Wait untill the process complete.
8. Check you 2GB usb or memory card.It,s now 4GB.Enjoy!!! If you usefull by it then share the post
everywhere or your friends thanks you.
File Size= 40KB
File Type= ZIP File
Monday, 29 July 2013
Operating systen & Version detection with NMAP-ii
Operating systen &
Version detection with NMAP
these
options can help us to gain more information about target. Most
widely used function is operating system identification [-o] , used
to identify O Srunning on the target machine.
msf
> nmap -O 192.168.2.108
[*]
exec: nmap -O 192.168.2.108
Starting
Nmap 6.25 ( http://nmap.org ) at 2013-07-29 18:18 IST
Nmap
scan report for 192.168.2.108
Host
is up (0.013s latency).
Not
shown: 986 closed ports
PORT
STATE SERVICE
80/tcp
open http
135/tcp
open msrpc
139/tcp
open netbios-ssn
445/tcp
open microsoft-ds
1688/tcp
open nsjtp-data
2869/tcp
open icslap
3306/tcp
open mysql
5357/tcp
open wsdapi
49152/tcp
open unknown
49153/tcp
open unknown
49154/tcp
open unknown
49155/tcp
open unknown
49157/tcp
open unknown
49158/tcp
open unknown
MAC
Address: 7C:E9:D3:34:4A:40 (Hon Hai Precision Ind. Co.)
Device
type: general purpose
Running:
Microsoft Windows 7|2008
OS
CPE: cpe:/o:microsoft:windows_7::- cpe:/o:microsoft:windows_7::sp1
cpe:/o:microsoft:windows_server_2008::sp1 cpe:/o:microsoft:windows_8
OS
details: Microsoft Windows 7 SP0 - SP1, Windows Server 2008 SP1, or
Windows 8
Network
Distance: 1 hop
OS
detection performed. Please report any incorrect results at
http://nmap.org/submit/ .
Nmap
done: 1 IP address (1 host up) scanned in 3.53 seconds
the
other widely used Nmap option is version detection (-sV) of different
open ports on the target. It can be mixxed with any of the scan
types.
msf
> nmap -sT -sV 192.168.2.105
[*]
exec: nmap -sT -sV 192.168.2.105
Starting
Nmap 6.25 ( http://nmap.org ) at 2013-07-29 18:39 IST
Nmap
scan report for 192.168.2.105
Host
is up (0.019s latency).
Not
shown: 996 closed ports
PORT
STATE SERVICE VERSION
21/tcp
open ftp?
135/tcp
open msrpc Microsoft Windows RPC
139/tcp
open netbios-ssn
445/tcp
open microsoft-ds Microsoft Windows XP microsoft-ds
1
service unrecognized despite returning data. If you know the
service/version, please submit the following fingerprint at
http://www.insecure.org/cgi-bin/servicefp-submit.cgi :
SF-Port21-TCP:V=6.25%I=7%D=7/29%Time=51F6698B%P=x86_64-unknown-linux-gnu%r
SF:(NULL,17,"220\x20220\x20RMNetwork\x20FTP\r\n");
MAC
Address: 00:03:47:62:8A:9E (Intel)
Service
Info: Host: 220; OS: Windows; CPE: cpe:/o:microsoft:windows
Service
detection performed. Please report any incorrect results at
http://nmap.org/submit/ .
Nmap
done: 1 IP address (1 host up) scanned in 8.67 seconds
Port scanning with NMAP-1
Port scanning with NMAP
port
scanning is active information gathering technique. Namp is used for
port scanning & we will analyze the various scan techniques in
detail./
Nmap
provides lots of different modes for scanning the target machines.
Here we will focus on four scans types namelt TCP connect scan ,
SYN Stealth scan , UDP scan and ACK scan. Let us
move ahead and start vthe scanning process.
TCP
connect scan :- is a basic &
default scan of nmp. It follow three way handshake process to detect
ports of target. Lets perform this to scan :-
root@debian:~#
nmap -sT -p1-10000 192.168.2.46
Starting
Nmap 6.25 ( http://nmap.org ) at 2013-07-29 13:34 IST
Nmap
scan report for 192.168.2.46
Host
is up (0.0015s latency).
Not
shown: 9997 filtered ports
PORT
STATE SERVICE
135/tcp
open msrpc
139/tcp
open netbios-ssn
445/tcp
open microsoft-ds
MAC
Address: 20:CF:30:CB:29:45 (Asustek Computer)
Nmap
done: 1 IP address (1 host up) scanned in 37.50 seconds
-sT
parameter denotes that we want to perform TCP connect scan
-p
parameter showa the rangr of ports we want to scan.
SYN
scan :- is considered as
stealth scanning as it never forms a complete sconnection between the
target and scanner. It is also called half open scanning.
root@debian:~#
nmap -sS 192.168.2.46
Starting
Nmap 6.25 ( http://nmap.org ) at 2013-07-29 13:46 IST
Nmap
scan report for 192.168.2.46
Host
is up (0.00061s latency).
Not
shown: 997 filtered ports
PORT
STATE SERVICE
135/tcp
open msrpc
139/tcp
open netbios-ssn
445/tcp
open microsoft-ds
MAC
Address: 20:CF:30:CB:29:45 (Asustek Computer)
Nmap
done: 1 IP address (1 host up) scanned in 17.80 seconds
UDP
scan :- is the techniques to
identify open UDP ports on target.0-byte UDP packets are sent to the
target & the recipient ofan ICMP port unreachable message shows
the port is closed other wise considered open.
root@debian:~#
nmap -sU 192.168.2.46
Starting
Nmap 6.25 ( http://nmap.org ) at 2013-07-29 13:52 IST
Nmap
scan report for 192.168.2.46
Host
is up (0.00065s latency).
Not
shown: 999 open|filtered ports
PORT
STATE SERVICE
137/udp
open netbios-ns
MAC
Address: 20:CF:30:CB:29:45 (Asustek Computer)
Nmap
done: 1 IP address (1 host up) scanned in 19.53 seconds
ACK
scan:- is
a special scan which tells which ports are filtered or unfiltered by
a firewall. It operates by sending TCP ACK frames to a remote port.
If there is no response then it considered to be a filtered port. If
the target returns an RST packet then the port is considered to be
unfiltered port.
root@debian:~#
nmap -sA 192.168.2.46
Starting
Nmap 6.25 ( http://nmap.org ) at 2013-07-29 13:57 IST
Nmap
scan report for 192.168.2.46
Host
is up (0.00020s latency).
All
1000 scanned ports on 192.168.2.46 are filtered
MAC
Address: 20:CF:30:CB:29:45 (Asustek Computer)
Nmap
done: 1 IP address (1 host up) scanned in 34.15 seconds
Thursday, 25 July 2013
How To Reveal Hidden Passwords (Asterisks) In Web Browsers
Passwords are usually shown in the the form of asterisk (*) or the dots on
each and every online site. We often wonder that there was a way to
change the dots into the real characters. Actually, there is!! This
trick is based on inspecting the element code and the slightest of
modification.
Here
i will be telling you this only about Facebook but once you get to know
this method you can do this on any site. And also this method is only
applicable on Google chrome and Mozilla Firefox only.
STEPS :
GOOGLE CHROME :
1. Open google chrome and then open the site (In this case Facebook).
2. Check if there are asterisks or dots in the password box.

3. If there are, right click anywhere between the password and click inspect element.

4. A half element window will open up in it, on bottom side of the element window you will see input type ="password".

5. Select the word "password" here and replace it with the word "text" so that it becomes input type ="text" and press Enter.

6. Now you can see the password instead of dots.

MOZILLA FIREFOX :
1. Open Firefox.
2. Download & install the InspectThis Add-on and restart firefox.

3. Download & install the DOM Inspector Add-on and restart firefox again.

4. Open the site (In this case Facebook).
5. Check if there are asterisks or dots in the password box.

6. If there are, right click anywhere between the password and click inspect element.

7. A new window will pop up named DOM Inspector, in this window in the attributes under the value tab "password" will be written. Double click on password.

8. An Edit Attribute window will pop out, Replace the node value "password" with "text". Click OK.

9. Close the DOM Inspector and you can see the Dots Replaced With Texts.

Thursday, 18 July 2013
How to Reset Your Forgotten Windows Password the Easy Way
How to Reset Your Forgotten Windows Password the Easy Way
![image[2]](http://cdn.howtogeek.com/wp-content/uploads/2011/11/image2.png "image[2]")
Forgetting your password is never any fun, but luckily there’s a really easy way to reset the password. All you need is a copy of the Windows installation disk and one simple command line trick.
Resetting Your Forgotten Windows Password
Boot off the Windows disk and select the “Repair your computer” option from the lower left-hand corner.
Follow through until you get to the option to open the Command Prompt, which you’ll want to select.

First you’ll want to type in the following command to backup the original sticky keys file:
copy c:\windows\system32\sethc.exe c:\Then you’ll copy the command prompt executable (cmd.exe) over top of the sticky keys executable:
copy c:\windows\system32\cmd.exe c:\windows\system32\sethc.exe

Now you can reboot the PC.
Resetting the Password
Once you get to the login screen, hit the Shift key 5 times, and you’ll see an administrator mode command prompt.
Now to reset the password—just type the following command, replacing the username and password with the combination you want:
net user geek MyNewPassword

That’s all there is to it. Now you can login.
Of course, you’ll probably want to put the original sethc.exe file back, which you can do by rebooting into the installation CD, opening the command prompt, and copying the c:\sethc.exe file back to c:\windows\system32\sethc.exe.
How to Change a Computer Password Using Command Prompt
- Reboot the computer
- 2Right after the bios is finished, hit F8 (or F2,F10,F12)
- 3Select 'Safe mode' or 'Safe mode with networking support'
- 4Windows will boot up to the logon screen. Click administrator, 9/10 there is no password.
- 5Open Command Prompt. You can go to Start > Run and type cmd.exe or simply search for cmd using the Windows search function.
- 6Type net user and press Enter. This will bring up a list of user accounts. Look here for the name and exact spelling of the account whose password you wish to change.
- 7Type net user name goes here *. Do not neglect any of the spaces (particularly the one before the *) or the command won’t work.
- 8Press Enter. Once submitted, the command will give you the option of typing a new password for the user.
- 9Carefully type the desired password and press Enter. The characters will not display as you type, so make sure the Caps Lock isn’t on and be very thorough with the spelling and punctuation.
- 10Retype the password to confirm. This should weed out any typos.
- 11Press Enter. The new password should go into effect immediately. If you get an error message or your access is denied, the account you’re working on doesn’t have high enough authorization to change any passwords. See Tips for possible solutions.


Subscribe to:
Posts (Atom)