Sunday, 20 February 2022
Tuesday, 25 January 2022
How to create your own QR code.
How to create your own QR code.

To dhttps://www.qr-code-generator.com/o this, we will use the QR-code-generator service, which can encode links and text, and also offers different options for image design.
To make the code, you just need to insert your information, generate and download an image.
Sunday, 16 January 2022
❇️ Top 3 Free Adware Removal Tools For Windows 10
❇️ Top 3 Free Adware Removal Tools For Windows 10
➖➖➖➖➖➖➖➖➖➖➖➖➖
🌐 It’s worth noting that plenty of adware removal tools is available on the internet. Still, since we can’t trust every software blindly, we have manually checked and listed only the useful adware removal tools.
1⃣ AdwCleaner
🔹 Well, AdwCleaner is one of the leading adware removal tools that Windows users should have on their system. The great thing about AdwCleaner is that the same team behind Malwarebytes backs it.
🔹 AdwCleaner uses some advanced mechanisms to scan and remove hidden adware from your system. Apart from adware, AdwCleaner can also remove Potentially Unwanted Programs (PUPs).
2⃣ Hitman Pro
🔹 Although not very popular, Hitman Pro is still one of the most effective antimalware tools you can use on Windows 10. The great thing about Hitman Pro is that it can be used alongside your existing antivirus program.
🔹 Like ADWcleaner, Hitman Pro also uses some advanced techniques to protect your computer against ransomware, adware, malware, viruses, and other types of security threats. Also, Hitman Pro is equally effective against Potentially Unwanted Programs (PUPs).
3⃣ BitDefender
🔹 If you are willing to spend money on a premium security suite, we recommend Bitdefender Antivirus. Bitdefender is one of the leading names in the security world, and it’s worth every penny.
🔹 The good thing about Bitdefender Antivirus is its utilization of system resources. You will hardly notice any difference in your system performance after using this security tool. The tool is pretty lightweight, and it offers robust protection against all types of security threats, including malware, viruses, adware, etc.
Keep Supporting
Tuesday, 11 January 2022
How to Create Super Slow Motion Effect in Adobe Premiere Pro 2019 | Gateway Solutions

How to Create Super Slow Motion Effect
in Adobe Premiere Pro 2019 | Gateway Solutions
Video Link of Tutorial :-https://youtu.be/gawW3bwmVGk
Create better-looking, smoother slow-motion effects by using
Optical Flow and Time Remapping effects in Adobe Premiere Pro.
Open the Speed/Duration dialog box, set Speed to 50% and
select Time Interpolation > Optical Flow.
For better results, click Effect Controls > Time
Remapping and Add Keyframes (optional to reduce and then increase speed within
the same clip).
Set speed for your slow motion.
Once you’re happy with the speed, click on Time
Interpolation > Optical Flow for smooth slow motion.
How to Import Presets in Premiere Pro | Gateway Solutions

This
article will show you how to install Adobe Premiere Pro Presets on any
operating system.
Video Tutorial Link :- https://youtu.be/z-sm1xTRSBA
Hey
There!
It can be
frustrating when you try and use presets for the first time. You try importing
them via the project window and get a "file type not supported" or
they just wont open. Fortunately, there is a simple process to install them!
To
install Presets to Adobe Premiere Pro, please follow the following steps:
1. Open Up Adobe Premiere
2. Navigate to the Effects Window. Right click on top of the
"Presets" folder. Select "Import Presets..."

3. A window should come up. Select the preset (.prfpset) then click on
Open
4. You should now see the installed presets under the Presets folder.
This is located inside the Effects window of Adobe Premiere Pro:

We hope
this information has been helpful and if you have any other questions, please
let us know!
Monday, 10 January 2022
Create a full Windows 10 diagnostic report
Create a full Windows 10 diagnostic report
When experiencing various issues with Windows 10, or when preparing to optimize your system for the best performance, generating full diagnostic reports can be very helpful.
The built-in Performance Monitor utility in Windows 10 is responsible for generating diagnostic reports. To generate a report, run the command perfmon /report at the command line (administrator).
The launched resource and performance monitor will collect information for some time, after which a sorted list with check results will be displayed in its window.
The report can be saved to a separate file. To do this, select Save As in the File main menu and specify the path to the desired folder. Reports are saved in HTML format.
How to restart the video driver in Windows 10
How to restart the video driver in Windows
If the version of the video driver is unstable, it occasionally fails to work. You can restart the driver on the fly without having to reboot the operating syste
For this purpose, Windows 10 has a special key combination that allows you to restart graphics card drivers without terminating the user session. The method is supported by NVIDIA, AMD and Intel driver
Press WIN + CTRL + SHIFT + B to restart the video drive
The screen will go blank for a second, you will hear a beep and then the image will reappear. This procedure is completely safe and has no effect on the applications running on your syste
O
Step 1: Save & Close all the opening apps
Step 2: Go to the desktop by pressing Windows Key + D button
Step 3: Now use the following shortcut keys to restart or refresh the graphics driver
Windows Key + CTRL + SHIFT +
B...r m.r.s.m.10 CTRL + SHIFT + B
Monday, 3 January 2022
Alternatives to paid programs - Photoshop, MS Office, 3ds Max, and various other products
#lifehack
Alternatives to paid programs
Photoshop, MS Office, 3ds Max, and various other products of this kind have extensive functionality. Their only disadvantage is that they are paid.
If you can't buy an application and you don't want to download it from a torrent, you can always look for alternatives. This is especially important when all the functionality of the giant is not used.
To select similar applications there is a service alternativeto.net. Its database includes more than 100k applications.
To use it, just specify the program name in the search field and click Find. You will be presented with a list of similar software or online services that have similar functionality.
https://alternativeto.net/
Thursday, 23 December 2021
How to Install and Use LUTs in Premiere Pro 2019 / 2021
How to Install and Use LUTs in Premiere Pro
LUTs, Premiere Pro, Tutorials, Video, Video Editing
Using LUTs can be helpful when color
grading footage in Premiere Pro.
With lookup tables, you are able to get a good color base
and can build from that point to grade your entire project. I usually like to
edit clip by clip to account for light/color inconsistencies.
In this tutorial, I will be covering the basics of
how to install and use LUTs in Premiere Pro. There are two main methods for
doing so. The first, which involves inputting LUTs individually, makes it easy
to add a LUT to your video quickly. The second method, which involves copying
the LUT files to another folder, takes a little longer, but has some key
benefits. Your LUTs will be added to Premiere Pro permanently following this
method allowing you to quickly load any LUT that you have already copied into
Premiere.
More on that below, first learn how to use LUTs in
Premiere Pro quickly through the Lumetri Color Panel.
1.
Import Footage
Start by importing your videos or
open a recent project. Once you have your clips ready to go, navigate to
the Color Tab and look for Basic Correction.

2.
Input Custom LUTs
In the Basic Correction section, you’ll see a button
titled ‘Input LUT’ with the clickable word ‘None’ next to it. Click this button
and then click Browse.

Clicking ‘Browse’ will open up your
folders. Navigate to the desired LUT you downloaded to apply it to your clip. I
will be using these free cinematic LUTs for this project.
Once applied, you can see the effects of the LUT on your footage. You’ll also
see the color waveforms change in your Lumetri Scopes tab to give you an idea
of how the LUT affects your clip.
From here you can adjust the White Balance, Tone,
Highlights/Shadows, and more to get your clip just right.

Copying
LUTs into Premiere Pro
If you want to add LUTs to Premiere Pro permanently
so you can just select them rather than look them up within your folders, you
can do that too. Here are the steps to do so on a Mac. I’ve included the files
paths for both Mac and PC below.
2019
Update from Adobe
Special thanks to Wes Howell from
Adobe for the insightful comment. Below are the updated and recommended instructions for adding multiple LUTs
in Adobe Premiere Pro 12.1:
“Basically, you create new shared folders for the
LUTs and then you can simply add your LUTs to them.”
Custom LUT directories
Available only to the local user
Create LUTs folder and then 2 folders within that
folder at the following location:
Per user directory:
Mac
Users
/Users//Library/Application
Support/Adobe/Common/LUTs/Creative
/Users//Library/Application
Support/Adobe/Common/LUTs/Technical
Windows
Users
C:\Users\\AppData\Roaming\Adobe\Common\LUTs\Creative
C:\Users\\AppData\Roaming\Adobe\Common\LUTs\Technical
Or use these directories if you’d like to make LUTs
available to all users
Mac
Users
/Library/Application
Support/Adobe/Common/LUTs/Creative
/Library/Application
Support/Adobe/Common/LUTs/Technical
Windows
Users
C:\Program
Files\Adobe\Common\LUTs\Creative
C:\Program
Files\Adobe\Common\LUTs\Technical
5.
Apply pre-loaded LUTs from the Lumetri Color Tab in Premiere.

If your LUTs are not showing up when
you try to load one from the dropdown, make sure you are under ‘Creative’. The
pre-loaded LUTs show up in the Creative section
of Lumetri Color, not the Basic Correction section.
This gives you the added benefit of being able to
adjust the intensity of your LUT making it less or more intense from the
current state.

File
Paths for Premiere Pro LUTs
Mac: /Library/Application
Support/Adobe/Common/LUTs/Creative
PC: C:\Program
Files\Adobe\Common\LUTs\Creative

Hope this article was able to help you use LUTs in
Premiere Pro! If you have a question about any of the steps or run into
errors/issues, feel free to leave a comment below and we’ll do our best to help
you out.
Tuesday, 21 December 2021
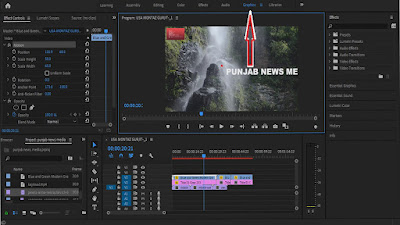
HOW TO INSTALL AND EDIT A MOGRT TEMPLATE IN ADOBE PREMIERE PRO
HOW TO INSTALL AND EDIT A MOGRT TEMPLATE IN ADOBE PREMIERE PRO
Mogrt is short for Motion
Graphics Template and is a single animation exported from Adobe After
Effects. For easy, seamless editing, open the .mogrt file template in
Premiere Pro via the Essential Graphics Panel.
In
this tutorial, you will learn how to use motion graphics templates in Adobe
Premiere Pro and edit them in just a few clicks. The process is identical on
both Windows and macOS.
If
you prefer to learn through video tutorials, check out tutorial
of "
How to add templates to Premiere Pro
Before
you begin, you’ll need:
·
Adobe Premiere Pro CC 2019/2020
(Installed)
·
A project with at least one sequence
·
Your favorite mogrt file downloaded
from Mixkit
How to Import the motion graphics
1.
Open your project in Premiere Pro
2.
Click Graphics at the top
3.
Find the Essential Graphics panel on
the right side of the screen. If it’s not open already, go to Window >
Essential Graphics
4.
In the right-bottom corner of the
panel click on the little template icon “Install Motion Graphics Template”
5. Browse
to the location of your mogrt file and select it, then click Open

6.
The motion graphics file may now be
found in the Essential Graphics panel under Browse
Tip: If
you have more than one mogrt to install speed up the import by putting the
mogrt on your Motion Graphics Templates system folder. Here’s where to find the
folder:
MAC:
username/Library/Application Support/Adobe/Common/Motion Graphics Templates
Windows
(PC): AppData/Roaming/Common/Motion Graphics Templates
How to Edit a Mogrt
1.
Drag a mogrt from the Essential
Graphics panel to timeline.

2.
Click the Edit tab in the Essential
Graphics panel. Here you may customize styling such as the colors, fonts, font
sizes and even positioning of the call out anchors.
