winxp important Commands
| |||
Accessibility
Controls
|
access.cpl
|
||
Add Hardware Wizard
|
hdwwiz.cpl
|
||
Add/Remove
Programs
|
appwiz.cpl
|
||
Administrative
Tools
|
control
admintools
|
||
Automatic Updates
|
wuaucpl.cpl
|
||
Bluetooth Transfer
Wizard
|
fsquirt
|
||
Calculator
|
calc
|
||
Certificate Manager
|
certmgr.msc
|
||
Character Map
|
charmap
|
||
Check Disk Utility
|
chkdsk
|
||
Clipboard Viewer
|
clipbrd
|
||
Command Prompt
|
cmd
|
||
Component Services
|
dcomcnfg
|
||
Computer Management
|
compmgmt.msc
|
||
Date and Time
Properties
|
timedate.cpl
|
||
DDE Shares
|
ddeshare
|
||
Device Manager
|
devmgmt.msc
|
||
Direct X Control
Panel
|
control color
|
||
Dr. Watson System
Troubleshooting Utility |
drwtsn32
|
||
Driver Verifier
Utility
|
verifier
|
||
Event Viewer
|
eventvwr.msc
|
||
File Signature
Verification Tool
|
sigverif
|
||
Findfast
|
findfast.cpl
|
||
Folders Properties
|
control folders
|
||
Fonts
|
control fonts
|
||
Fonts Folder
|
fonts
|
||
Free Cell Card Game
|
freecell
|
||
Game
Controllers
|
joy.cpl
|
||
Group Policy
Editor
|
gpedit.msc
|
||
Hearts Card Game
|
mshearts
|
||
Iexpress Wizard
|
iexpress
|
||
Indexing Service
|
ciadv.msc
|
||
Internet Properties
|
inetcpl.cpl
|
||
IP Configuration
(Display Connection Configuration)
|
ipconfig /all
|
||
IP Configuration
(Display DNS Cache Contents)
|
ipconfig
/displaydns
|
||
IP Configuration
(Delete DNS Cache Contents)
|
ipconfig /flushdns
|
||
IP Configuration
(Release All Connections)
|
ipconfig /release
|
||
IP Configuration
(Renew All Connections)
|
ipconfig /renew
|
||
IP Configuration
(Refreshes DHCP & Re-Registers DNS)
|
ipconfig
/registerdns
|
||
IP Configuration
(Display DHCP Class ID)
|
ipconfig
/showclassid
|
||
IP Configuration
(Modifies DHCP Class ID)
|
ipconfig
/setclassid
|
||
Java Control Panel
(If Installed)
|
jpicpl32.cpl
|
||
Java Control Panel
(If Installed)
|
javaws
|
||
Keyboard Properties
|
control
keyboard
|
||
Local Security
Settings
|
secpol.msc
|
||
Local Users and
Groups
|
lusrmgr.msc
|
||
Logs You Out Of
Windows
|
logoff
|
||
Microsoft Chat
|
winchat
|
||
Minesweeper Game
|
winmine
|
||
Mouse Properties
|
control mouse
|
||
Mouse Properties
|
main.cpl
|
||
Network Connections
|
control
netconnections
|
||
Network Connections
|
ncpa.cpl
|
||
Network Setup
Wizard
|
netsetup.cpl
|
||
Notepad
|
notepad
|
||
Nview Desktop
Manager face=Verdana>
|
nvtuicpl.cpl
|
||
Object Packager
|
packager
|
||
ODBC Data Source
Administrator
|
odbccp32.cpl
|
||
On Screen Keyboard
|
osk
|
||
Opens AC3 Filter
(If Installed)
|
ac3filter.cpl
|
||
Password Properties
|
password.cpl
|
||
Performance Monitor
|
perfmon.msc
|
||
Performance Monitor
|
perfmon
|
||
Phone and Modem
Options
|
telephon.cpl
|
||
Power
Configuration
|
powercfg.cpl
|
||
Printers and Faxes
|
control
printers
|
||
Printers Folder
|
printers
|
||
Private Character
Editor
|
eudcedit
|
||
Quicktime
style=”font-size:10.0pt;(If Installed)
|
QuickTime.cpl
|
||
Regional
Settings
|
intl.cpl
|
||
Registry Editor
|
regedit
|
||
Registry Editor
|
regedit32
|
||
Remote Desktop
|
mstsc
|
||
Removable Storage
|
ntmsmgr.msc
|
||
Removable Storage
Operator Requests
|
ntmsoprq.msc
|
||
Resultant Set of
Policy (XP Prof)
|
rsop.msc
|
||
Scanners and
Cameras
|
sticpl.cpl
|
||
Scheduled Tasks
|
control
schedtasks
|
||
Security Center
|
wscui.cpl
|
||
Services
|
services.msc
|
||
Shared Folders
|
fsmgmt.msc
|
||
Shuts Down Windows
|
shutdown
|
||
Sounds and
Audio
|
mmsys.cpl
|
||
Spider Solitare
Card Game
|
spider
|
||
SQL Client
Configuration
|
cliconfg
|
||
System
Configuration Editor
|
sysedit
|
||
System
Configuration Utility
|
msconfig
|
||
System File Checker
Utility (Scan Immediately)
|
sfc /scannow
|
||
System File Checker
Utility (Scan Once At Next Boot)
|
sfc /scanonce
|
||
System File Checker
Utility (Scan On Every Boot)
|
sfc /scanboot
|
||
System File Checker
Utility (Return to Default Setting)
|
sfc /revert
|
||
System File Checker
Utility (Purge File Cache)
|
sfc /purgecache
|
||
System File Checker
Utility (Set Cache Size to size x)
|
sfc /cachesize=x
|
||
System
Properties
|
sysdm.cpl
|
||
Task Manager
|
taskmgr
|
||
Telnet Client
|
telnet
|
||
User Account
Management
|
nusrmgr.cpl
|
||
Utility Manager
|
utilman
|
||
Windows Firewall
|
firewall.cpl
|
||
Windows Magnifier
|
magnify
|
||
Windows Management
Infrastructure
|
wmimgmt.msc
|
||
Windows System
Security Tool
|
syskey
|
||
Windows Update Launches
|
wupdmgr
|
||
Windows XP Tour
Wizard
|
tourstart
|
||
Wordpad
|
write
|
Tuesday, 9 June 2015

Microsoft's Windows XP Home Install step by step.
This will give you an idea on
how to do this when and if the time arises for US to either reinstall the
operating system, install for the first time or upgrade OUR present operating
system. This install guide is fully graphical and will take us through each
step of the installation.
What we will require to do
this walkthrough is
A Windows XP Home CD
A Computer with CD-ROM access
To start this Windows
install. First check that the first boot device in your system BIOS is set to
the CD-ROM Drive
( To find out how to
access the BIOS please refer to your motherboard manual or the manufacturer of
your Computer. (The system bios can usually be entered on boot, usually by
pressing the F1, F2, F8, F10 or DEL
If you are unsure or don't
want to enter the BIOS then just test the computer by putting the CD-ROM in the
drive and reboot your computer. This is the recommended way to install windows.
|
PART 1
|
To begin insert your Windows
XP Home CD and reboot you computer. Setup will boot automatically and then
inspect your computer hardware and configuration.

Setup now prepares your
computer for install.

From this menu press
"ENTER" to begin the install.

Windows XP License agreement,
read, and if you agree press "F8" to continue, press "ESC"
if you disagree. If you disagree setup will finish.

|
PART 2
|
Now you have to select where
to install XP. Press "ENTER" to confirm the partition you want to
install into.

Now you need to format the
hard drive, NTFS is recommended, but you can also use FAT32. Make your decision
using the arrow keys and press enter.

The hard drive will now
format.

|
PART 3
|
and then setup will begin to
copy files.

Setup now initialises the
Windows XP configuration.

It is now time to restart
Windows XP, press "ENTER" to speed up process, otherwise Windows will
do it itself in 15 seconds.

Boot will recognize that the
XP CD is in the drive, DO NOT press any keys, let setup bypass the CD boot.

Windows is now booting.

|
PART 4
|
The install process
continues.

Now your regional and
language options. Your mouse should now be active, so click on
"CUSTOMIZE".

Now select your Standards and
Formats, plus your location, then click "OK".

Now click on
"DETAILS".

Next select your default
language, click "OK" when done

Now that you have made all
necessary changes click on "NEXT".

|
PART 5
|
Now it is time to personalize
Windows. File in your name and if you wish you can also file in the
Organization section. Click "NEXT" when ready.

Now it is time for your
product key. The product key will be on the packaging that XP was supplied
with. It is 25 digits long. Some OEM computers will have a sticker on the side
or back with your product key. Input the key and press next .
Now select your computer name
and your admin password. Confirm the Admin password and press "NEXT".

Date and Time settings are
next, change as need be, then press "NEXT".

Windows will then continue
installing.

|
PART 6
|
If a network card has been
detected then you will get the following menu. Select "TYPICAL
SETTINGS" and press next. This configured later in Windows.

More network configuration,
change workgroup name if need be and click "NEXT".

Windows will continue
installing.

Windows install will now
finalize.
It is now time to restart
Windows XP again, press "ENTER" to speed up process, otherwise
Windows will do it itself in 15 seconds.

Boot will recognize that the
XP CD is in the drive, DO NOT press any keys, let setup bypass the CD boot.

Windows will continue
loading.

|
PART 7
|
Windows will now adjust your
resolution, click "OK" to continue.

If you are happy with the
changes, click "OK" otherwise press "Cancel" to return to
the old settings

"Welcome to Microsoft
Windows" screen now appears, press "Next" to continue.

Internet connection option is
next. If your computer connects to a home network or directly using the network
card, or is on a network then select "Yes", otherwise select “No” 
|
PART 8
|
Activate Windows option
appears next, we recommend that you select "No, remind me every few
days", that will allow you to make sure everything is correct and running
OK before you use up one of your activate attempts. It also allows you to setup
your security options and internet connection correctly. Click "Next to continue"

Windows now thanks you, click
"Finish" to continue.

Finally setup the users for
the computer, you must fill in option beside "Your name" the other
four users are optional. Click "Next" once you have finished to
continue.

Windows will now apply your
settings...

Now Windows
"WELCOME" screen.

and finally the Windows XP
Desktop. Windows is now installed.

If you have commonly used
P-III you will have no drivers to install, but chances are the next step will
be to install them. Check out device manager for unknown devices, likely items
are Network Cards, Sound Cards, Printers, Scanners, Graphics Cards, Digital
Cameras, plus any other item you have. Also consider installing
anti-virus software, spyware software and possibly a 3rd party Firewall.
Cracking Windows (xp,vista,7,8) Passwords With Backtrack.
Using OphCrack.
Using Ophcrack,You can crack account password of almost all the Windows till date,And since OphCrack is the fastest password cracking tool,it wont take more than 4-5 minutes to crack a password.So let's begin -
What Do You Need ?
BackTrack 5 Live DVD.
Rainbow Files (i'll tell you what it is.)
Physical Access to victim PC.
So What-The-Hell is Rainbow Files ?
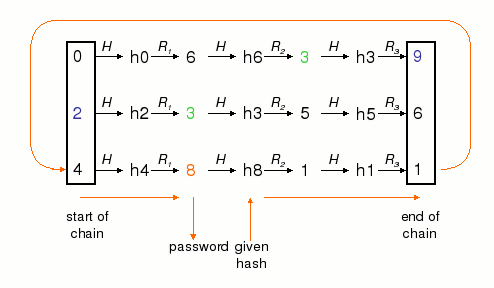 First thing that pops in mind when reading rainbow files is the collection of rainbows and unicorns flying,but no,Rainbow Files/Tables are basically huge sets of precomputed tables filled with hash values that are pre-matched to possible plaintext passwords. The Rainbow Tables essentially allow hackers to reverse the hashing function to determine what the plaintext password might be. It's possible for two different passwords to result in the same hash so it's not important to find out what the original password was, just as long as it has the same hash. The plaintext password may not even be the same password that was created by the user, but as long as the hash is matched, then it doesn't matter what the original password was.
So What Do I Need To Do ?
You need to download the rainbow tables matching to the OS Version of your victim PC,Get Them Here.You can download the smaller files because they will work,unless your victim is the Head of FBI who uses 28 letter long password.NOTE : the vista files will work for Windows 7 and Windows 8 too.
Everything is Downloaded and ready,Now -
Put the downloaded rainbow tables in a flash drive,and pick that BackTack 5 Live DVD too.
Let The Hack Begin -
Step 1 -
Boot the Victim PC with BackTrack Live DVD.
Step 2 -
Now Navigate To The Directory where windows password files are Stored.
WINDOWS/system32/config/
Step 3 -
Locate the Files "SAM" and "System",and copy them to a new folder on BackTrack desktop.
Step 4 -
Run The OphCrack tool in backtrack by : start->Backtrack->Privilege Escalation->Password Attack->offline Attacks-ophCrack GUI.
Step 5 -
Go to "Load" and select "Encrypted SAM" in ophcrack tool.Now it will ask you to select directory that contains SAM folder. Select the directory where you saved the SAM file (new folder on desktop).
Step 6 -
Target The Administrator Account,remove other account off the list (if any).
Step 7 -
Plug in the pen-drive/flash drive,Extract The Rainbow Tables to Desktop.
Step 8 -
Click on the Table button in ophcrack tool. Now it will ask you to selec the table. Select the files as required.Click OK after that.
Step 9 -
Now Hit the Crack Button,and wait for 3-4 minutes,You will have the key in your hands .
Saturday, 30 May 2015
F o o t p r i n t i n g T e r m i n o l o g y
A c t i v e I n f o r m a t i o n G a t h e r i n g
In active information gathering, process attackers mainly focus on the employees of the target organization. Attackers try to extract information from the employees by conducting social engineering: on-site visits, interviews, questionnaires, etc. This refers to the process of collecting information from sources anonymously so that your efforts cannot be traced back to you.
P s e u d o n y m o u s F o o t p r i n t i n g
Pseudonymous footprinting refers to the process of collecting information from the
sources that have been published on the Internet but is not directly linked to the author's
name. The information may be published under a different name or the author may have a
well-established pen name, or the author may be a corporate or government official and be
prohibited from posting under his or her original name. Irrespective of the reason for hiding the
Private fo o tp r in t" " in g involves collecting information from an organization's webbased
calendar and email services.
I n t e r n e t F o o t p r i n t i n g
Internet footprinting refers to the process of collecting information of the target
organization's connections to the Internet.
A n o n y m o u s F o o t p r i n t i n g
author's name, collecting information from such sources is called pseudonymous.
O r g a n i z a t i o n a l o r P r i v a t e F o o t p r i n t i n g
Private foot printooing involves collecting information from an organization's webbased
calendar and email services.
A c t i v e I n f o r m a t i o n G a t h e r i n g
In active information gathering, process attackers mainly focus on the employees of the target organization. Attackers try to extract information from the employees by conducting social engineering: on-site visits, interviews, questionnaires, etc. This refers to the process of collecting information from sources anonymously so that your efforts cannot be traced back to you.
P s e u d o n y m o u s F o o t p r i n t i n g
Pseudonymous footprinting refers to the process of collecting information from the
sources that have been published on the Internet but is not directly linked to the author's
name. The information may be published under a different name or the author may have a
well-established pen name, or the author may be a corporate or government official and be
prohibited from posting under his or her original name. Irrespective of the reason for hiding the
Private fo o tp r in t" " in g involves collecting information from an organization's webbased
calendar and email services.
I n t e r n e t F o o t p r i n t i n g
Internet footprinting refers to the process of collecting information of the target
organization's connections to the Internet.
A n o n y m o u s F o o t p r i n t i n g
author's name, collecting information from such sources is called pseudonymous.
O r g a n i z a t i o n a l o r P r i v a t e F o o t p r i n t i n g
Private foot printooing involves collecting information from an organization's webbased
calendar and email services.
Thursday, 28 May 2015
Ethical hacking
is legal hacking conducted by a penetration tester in order to evaluate
the security of an IT infrastructure with the permission of an organization. The concept of
ethical hacking cannot be explained or cannot be performed in a single step; therefore, it has
been divided into several steps. Footprinting is the first step in ethical hacking, where an
attacker tries to gather information about a target. To help you better understand foo tp rin ting ,
it has been distributed into various sections:
Footprinting Concepts
Footprinting Tools
Footprinting Threats
FootPrintng Countermeasures
Footprinting Methodology
Footprinting Penetration Testing
O p e n S o u r c e o r P a s s i v e I n f o r m a t i o n G a t h e r i n g
Open source or passive information gathering is the easiest way to collect information
about the target organization. It refers to the process of gathering information from the open sources, i.e., publicly available sources. This requires no direct contact with the target organization. Open sources may include newspapers, television, social networking sites, blogs, etc.
Using these, you can gather information such as network boundaries, IP address reachable via the Internet, operating systems, web server software used by the target network, TCP and UDP services
n each system, access control mechanisms, system architecture, intrusion detection systems, and so on.
Wednesday, 27 May 2015
How to Find IMEI Number of Any Phone
When you're registering your phone, or trying to sell an old one online, you might be asked for your IMEI number. If you're drawing a blank and trying desperately to find out what this number is, don't worry. The IMEI (International Mobile Station Equipment Identity) is a unique number assigned to every mobile phone sold via official channels. This number is very useful if you lose your phone, or if it is stolen. Police usually require you to mention the IMEI number when reporting your phone as stolen and, then, depending upon the local laws, your phone can be blocked from accessing networks or placing calls by blacklisting its IMEI.
Note that an IMEI is associated with a SIM slot, so dual SIM phones will have two IMEI numbers. Similarly, tablets with cellular connectivity will also have a IMEI number.
This makes the number important in emergency situations. And if the device is located, you can use the IMEI number to establish that it is indeed your phone. This is how to find your phone's IMEI number.
When you have the phone:
USSD code
This is the simplest method of finding your phone's IMEI number. The good thing about this method is that it is more or less universal. It works on almost all feature phones and smartphones, so try this before you go hunting for the phone's bill.
- Dial *#06# on your phone.
- The IMEI number will now be displayed on the screen. You should note it down somewhere safe or you can always take a screenshot.
On the phone
If you have an iPhone 5 or newer iPhone, the IMEI is also engraved on the back panel. Just flip the phone to note it down. On iPhone 4s or older iPhones, the IMEI is printed on the SIM tray.
Check Settings
On Android, go to Settings > About > IMEI to see the IMEI number. Tap Status and scroll down to see the IMEI information.
On an iPhone, tap Settings > General > About and scroll down to IMEI.
On most other phones with a removable battery, the IMEI is printed on a sticker that is inside the phone, under the battery. Take the battery out to check.
When you don't have the phone:
Retail box or bill
The retail box and the bill both have the IMEI number written on them, which is a good reason to keep them safe instead of throwing them out. Keep the box safe at least, because it will be useful if you need to check the IMEI, or if you choose to resell the phone at a later date. The IMEI number will be on the sticker on the side of the box.
Android
Android users can check their device's IMEI number even if they've lost the phone. All the methods mentioned above work perfectly and are faster, but if you've lost the phone and not kept the box, this can still bail you out.
- Log in to Google Dashboard using the Google account linked to the Android phone.
- Click Android, next to the green robot logo.
- This will reveal a list of devices registered to the account, along with their IMEI numbers.
Subscribe to:
Posts (Atom)